HeartBit
| Inventor | Andrija Gajic |
| micro:bit IDE | Python Editor |
| Best Location | Makerspace |
Project Overview
Have you ever decided to exercise or dance, but you were not feeling the music? Well, rest assured, the handy little HeartBit device is there to come to the rescue.
The HeartBit device converts your position, vitals, and muscle signals into a unique and personalized music experience! Now imagine THAT with your workout routine!
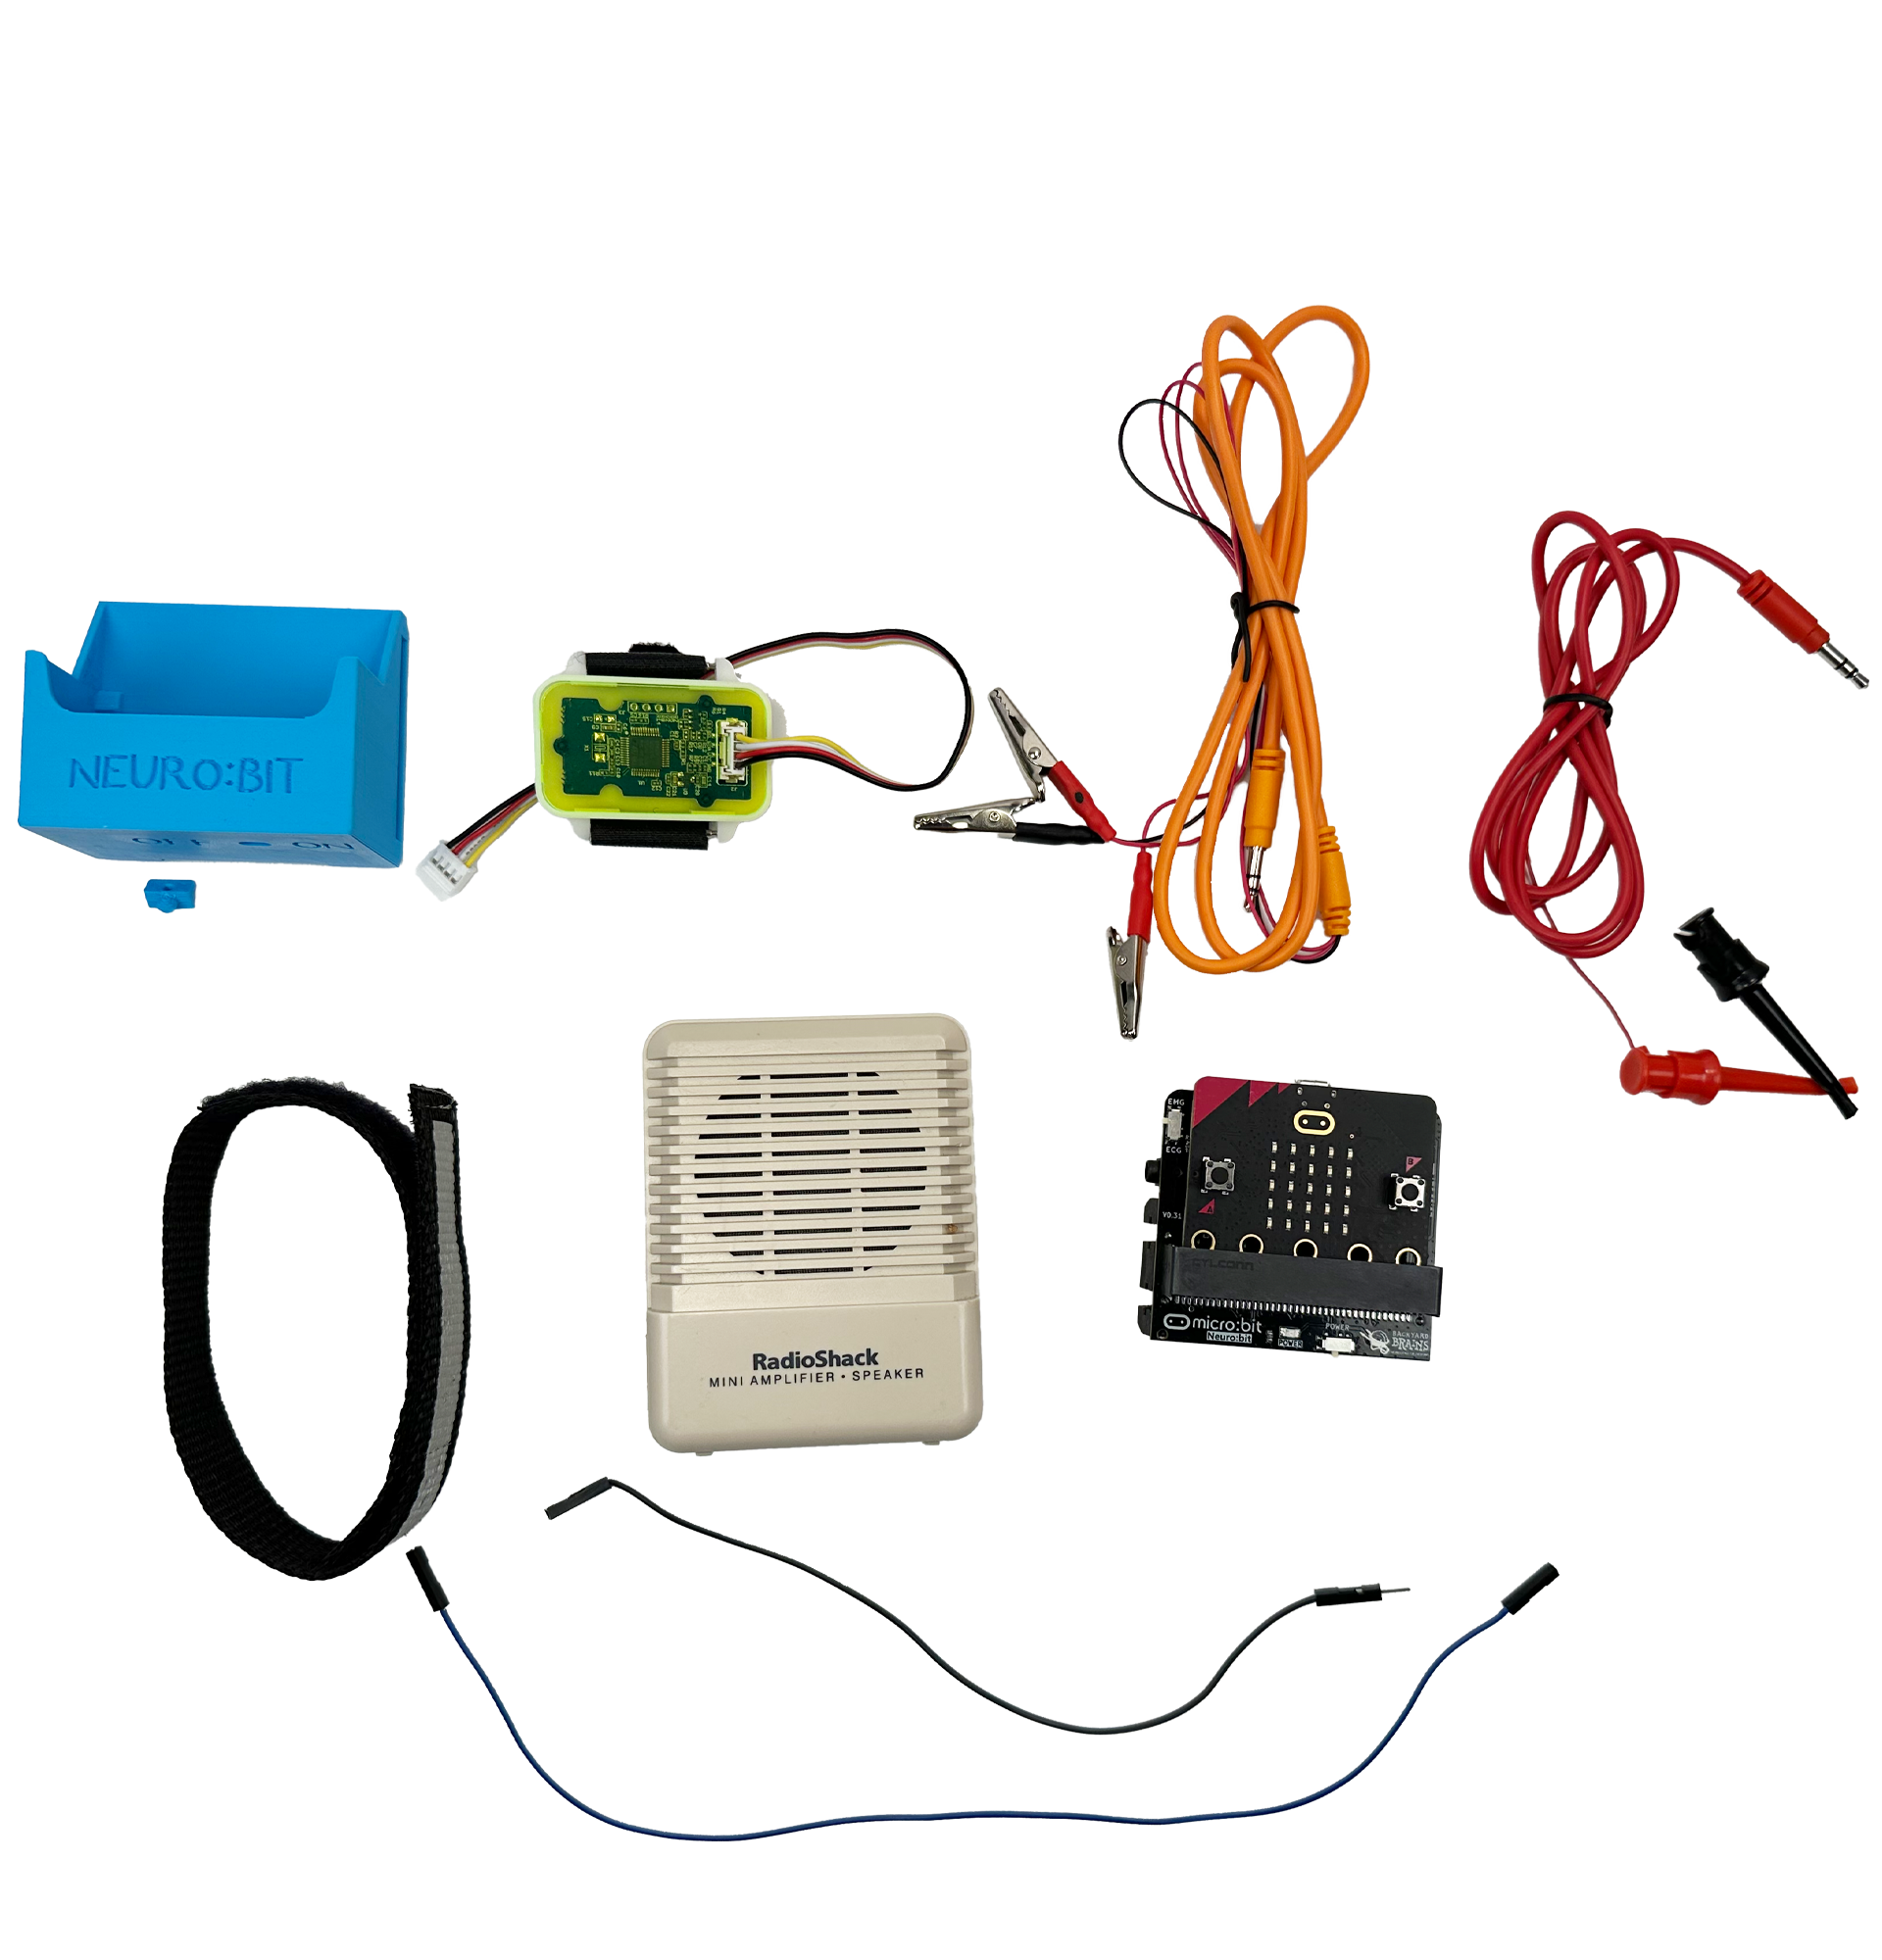
Material and parts
- 1 x micro:bit & Spiker:bit kit
- 1 x 3D printer and filament
- 3 x EMG electrodes (Hot, Hot, Ground)
- 1 x EMG cable
- 1 x Grove heart rate sensor
- 2 x Cables with pins for connecting to an external speaker
- 1 x RadioShack external speaker
How it all works
There is a multitude of ways that the HeartBit device makes its sound; let’s go through them one by one:
The micro:bit and Spiker:bit devices - They constantly check their position and based on it produce a select tone from the C Major scale. The commands are as follows:
- Tilting your wrist upwards produces a C
- Laying your wrist flat produces a D
- Tilting your wrist downwards produces an E
- Tilting it sideways to the left produces an F
- Tilting it sideways to the right produces a G
- Shaking the whole contraption produces an A
- touching the golden logo of the micro:bit produces an H and
- Flipping your hand upside-down produces an octave leap and a C an octave higher.
The heart rate monitor - It constantly checks your vitals, more specifically your heart rate per minute via an oximeter. This value then updates the BPM of the notes produced to be twice that of your actual heart's BPM. Thus making a sick dance music gadget too!
The EMG electrodes - They check for muscle contractions. The muscle's tension from your brain's electrical signals determines how loud the produced notes will be. I noticed it's tiring to tightly flex for long periods of time, so I have implemented a lower limit where you can still hear a tone without much effort. Of course, you can still tense up to produce louder tones!
Connecting it all
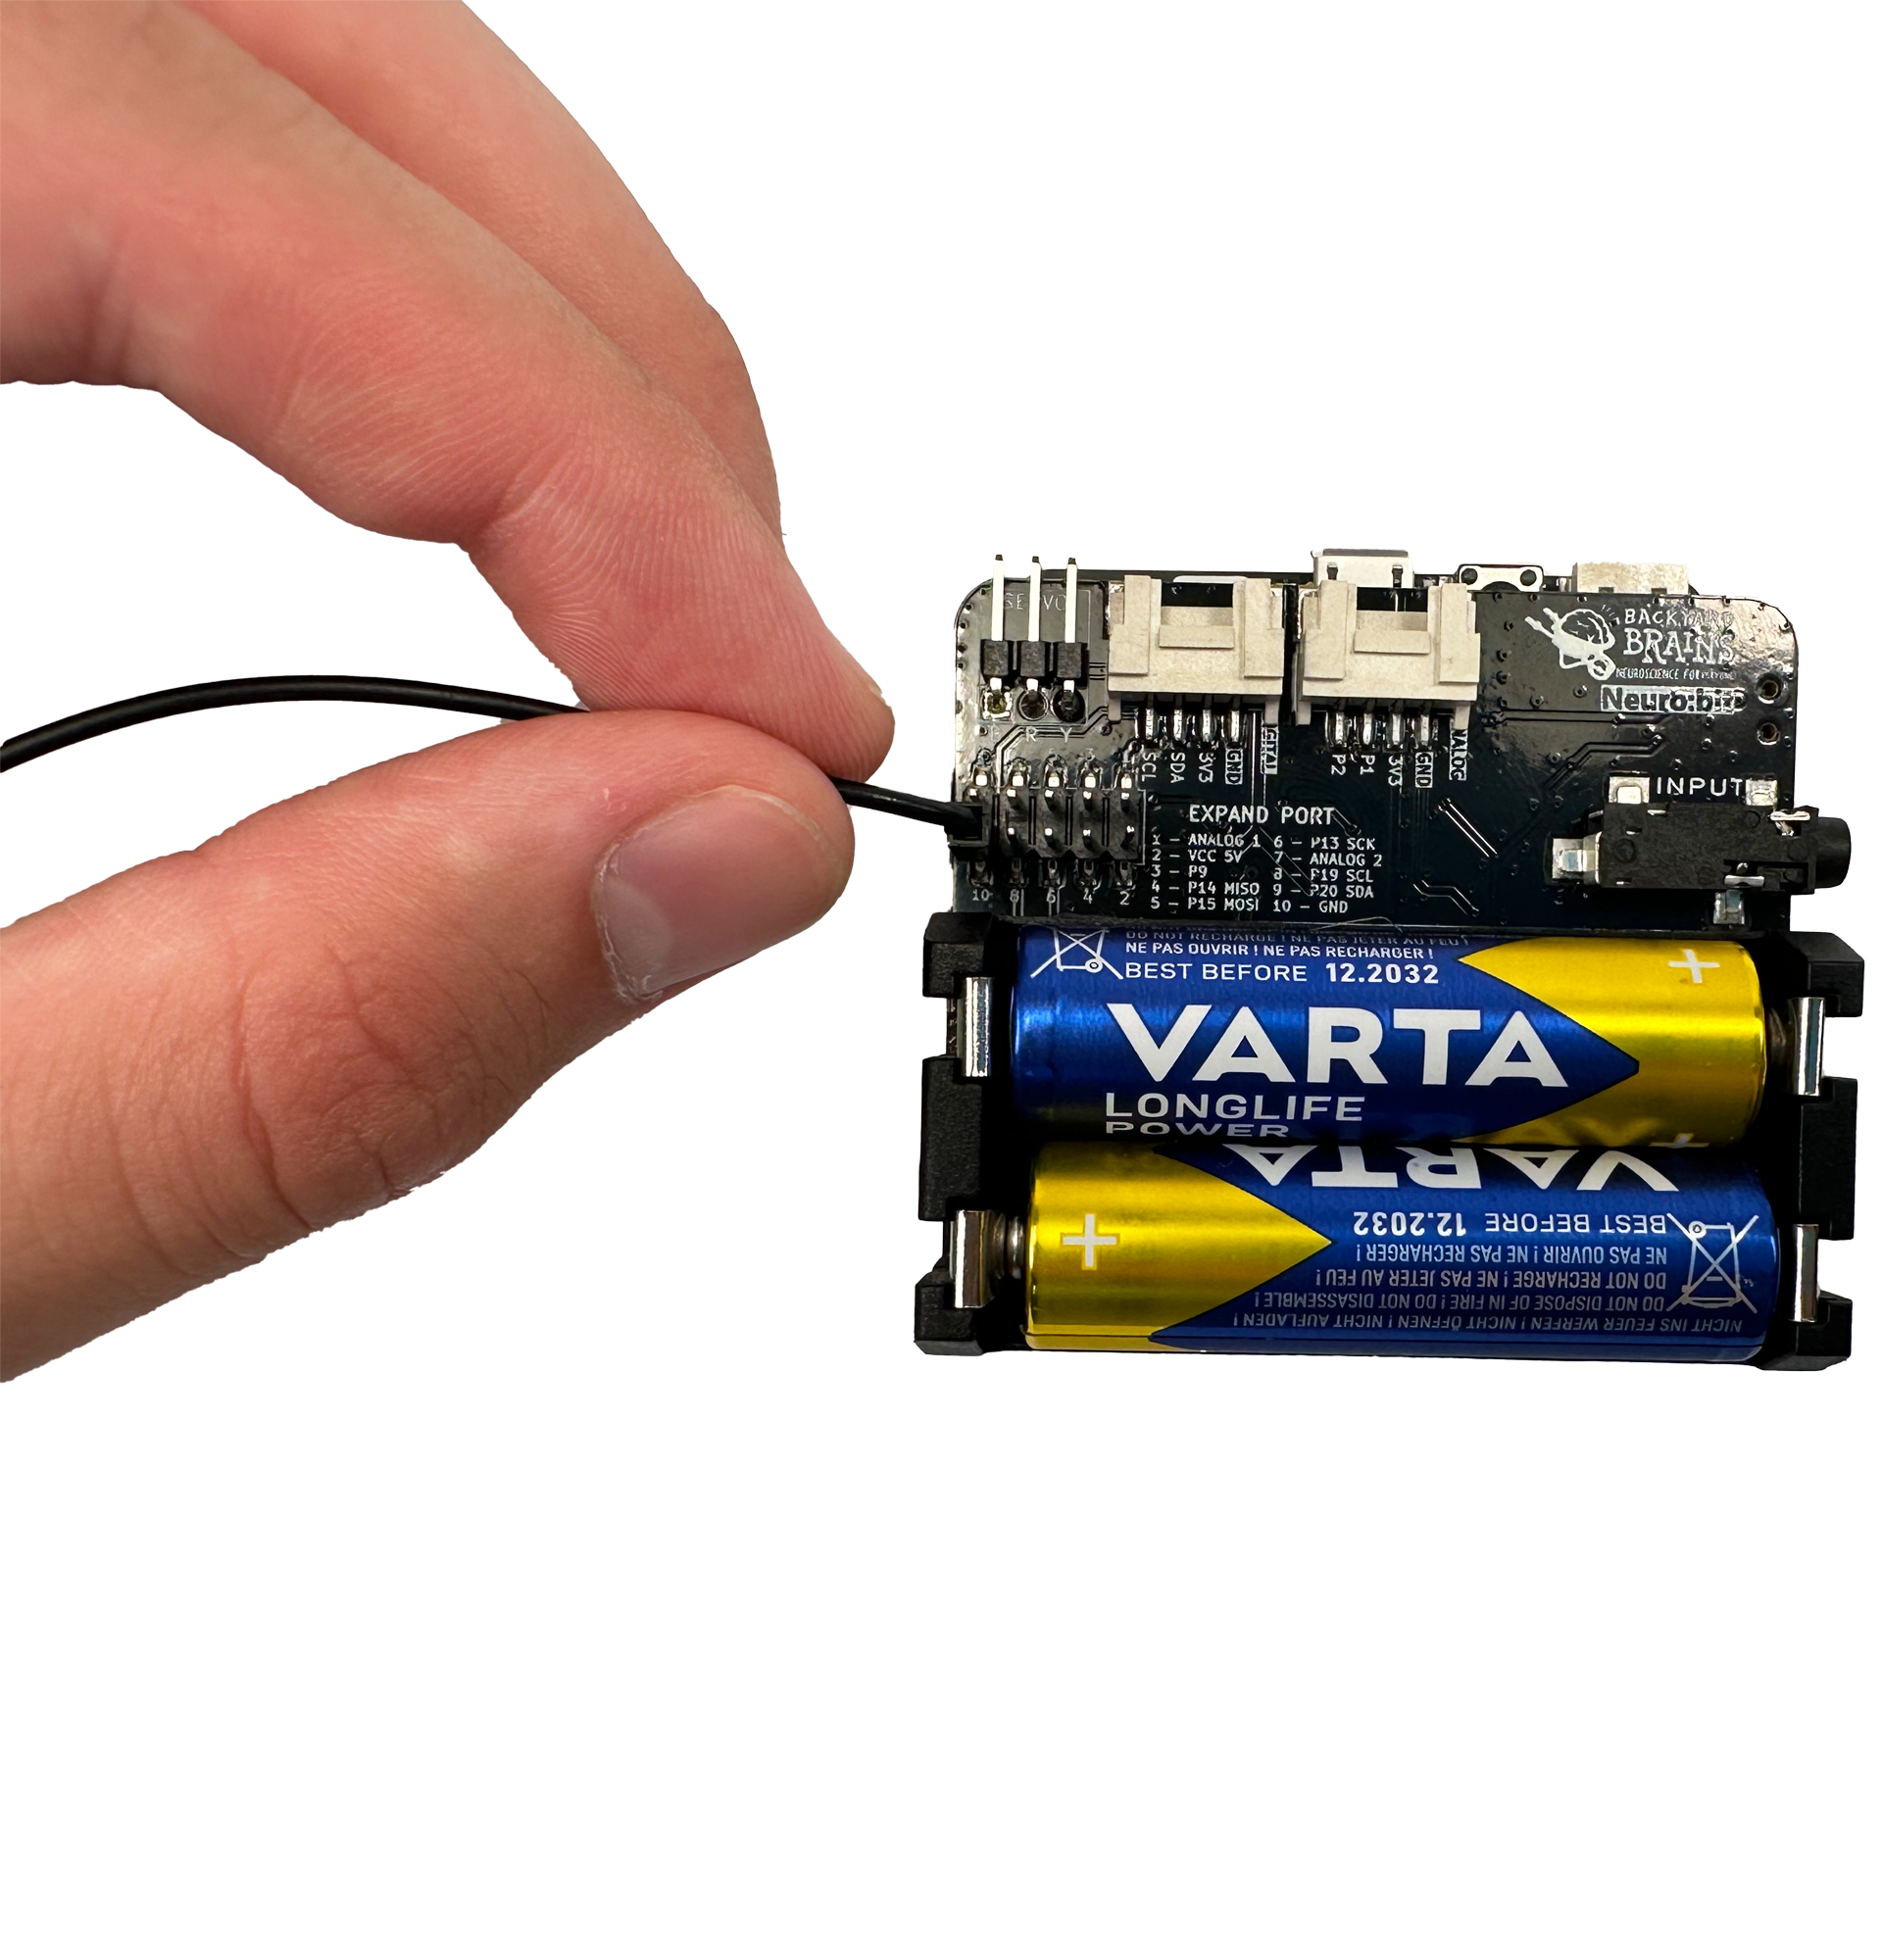
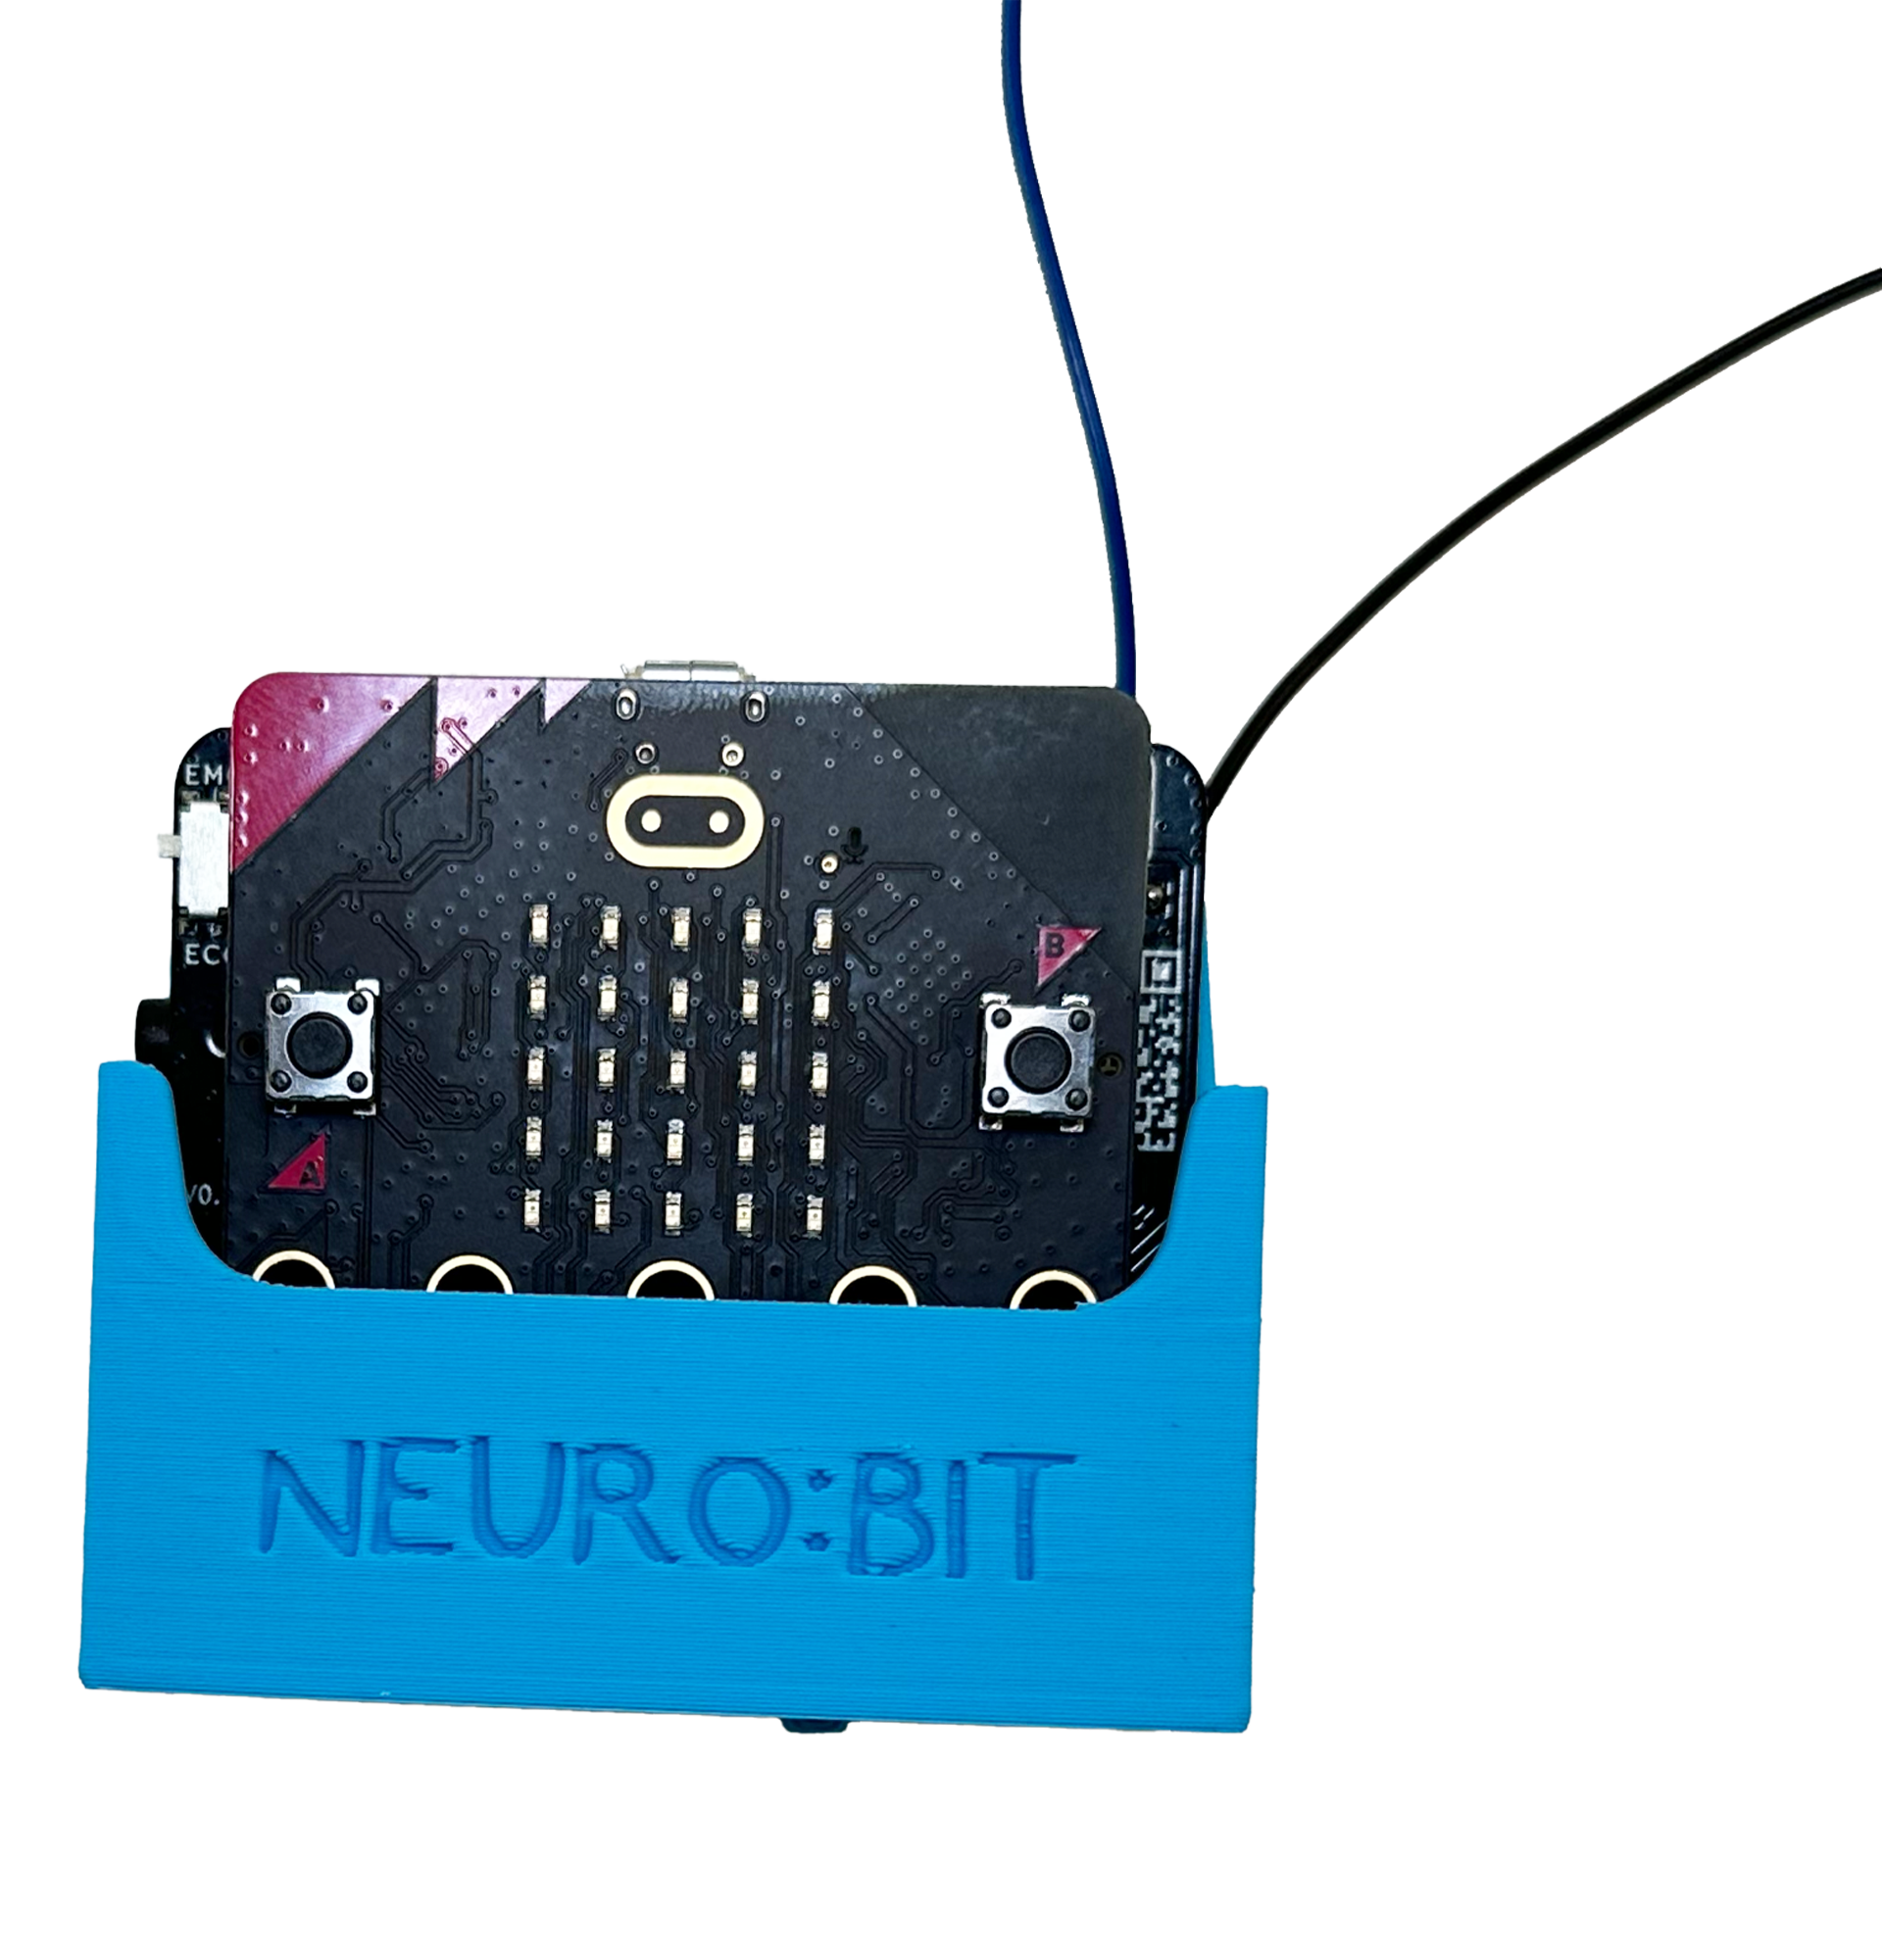
- Attach a female connector to pin 10, the wire is black as that's the standard for connecting to ground
- Attach the signal wire to pin 7. The example wire is blue
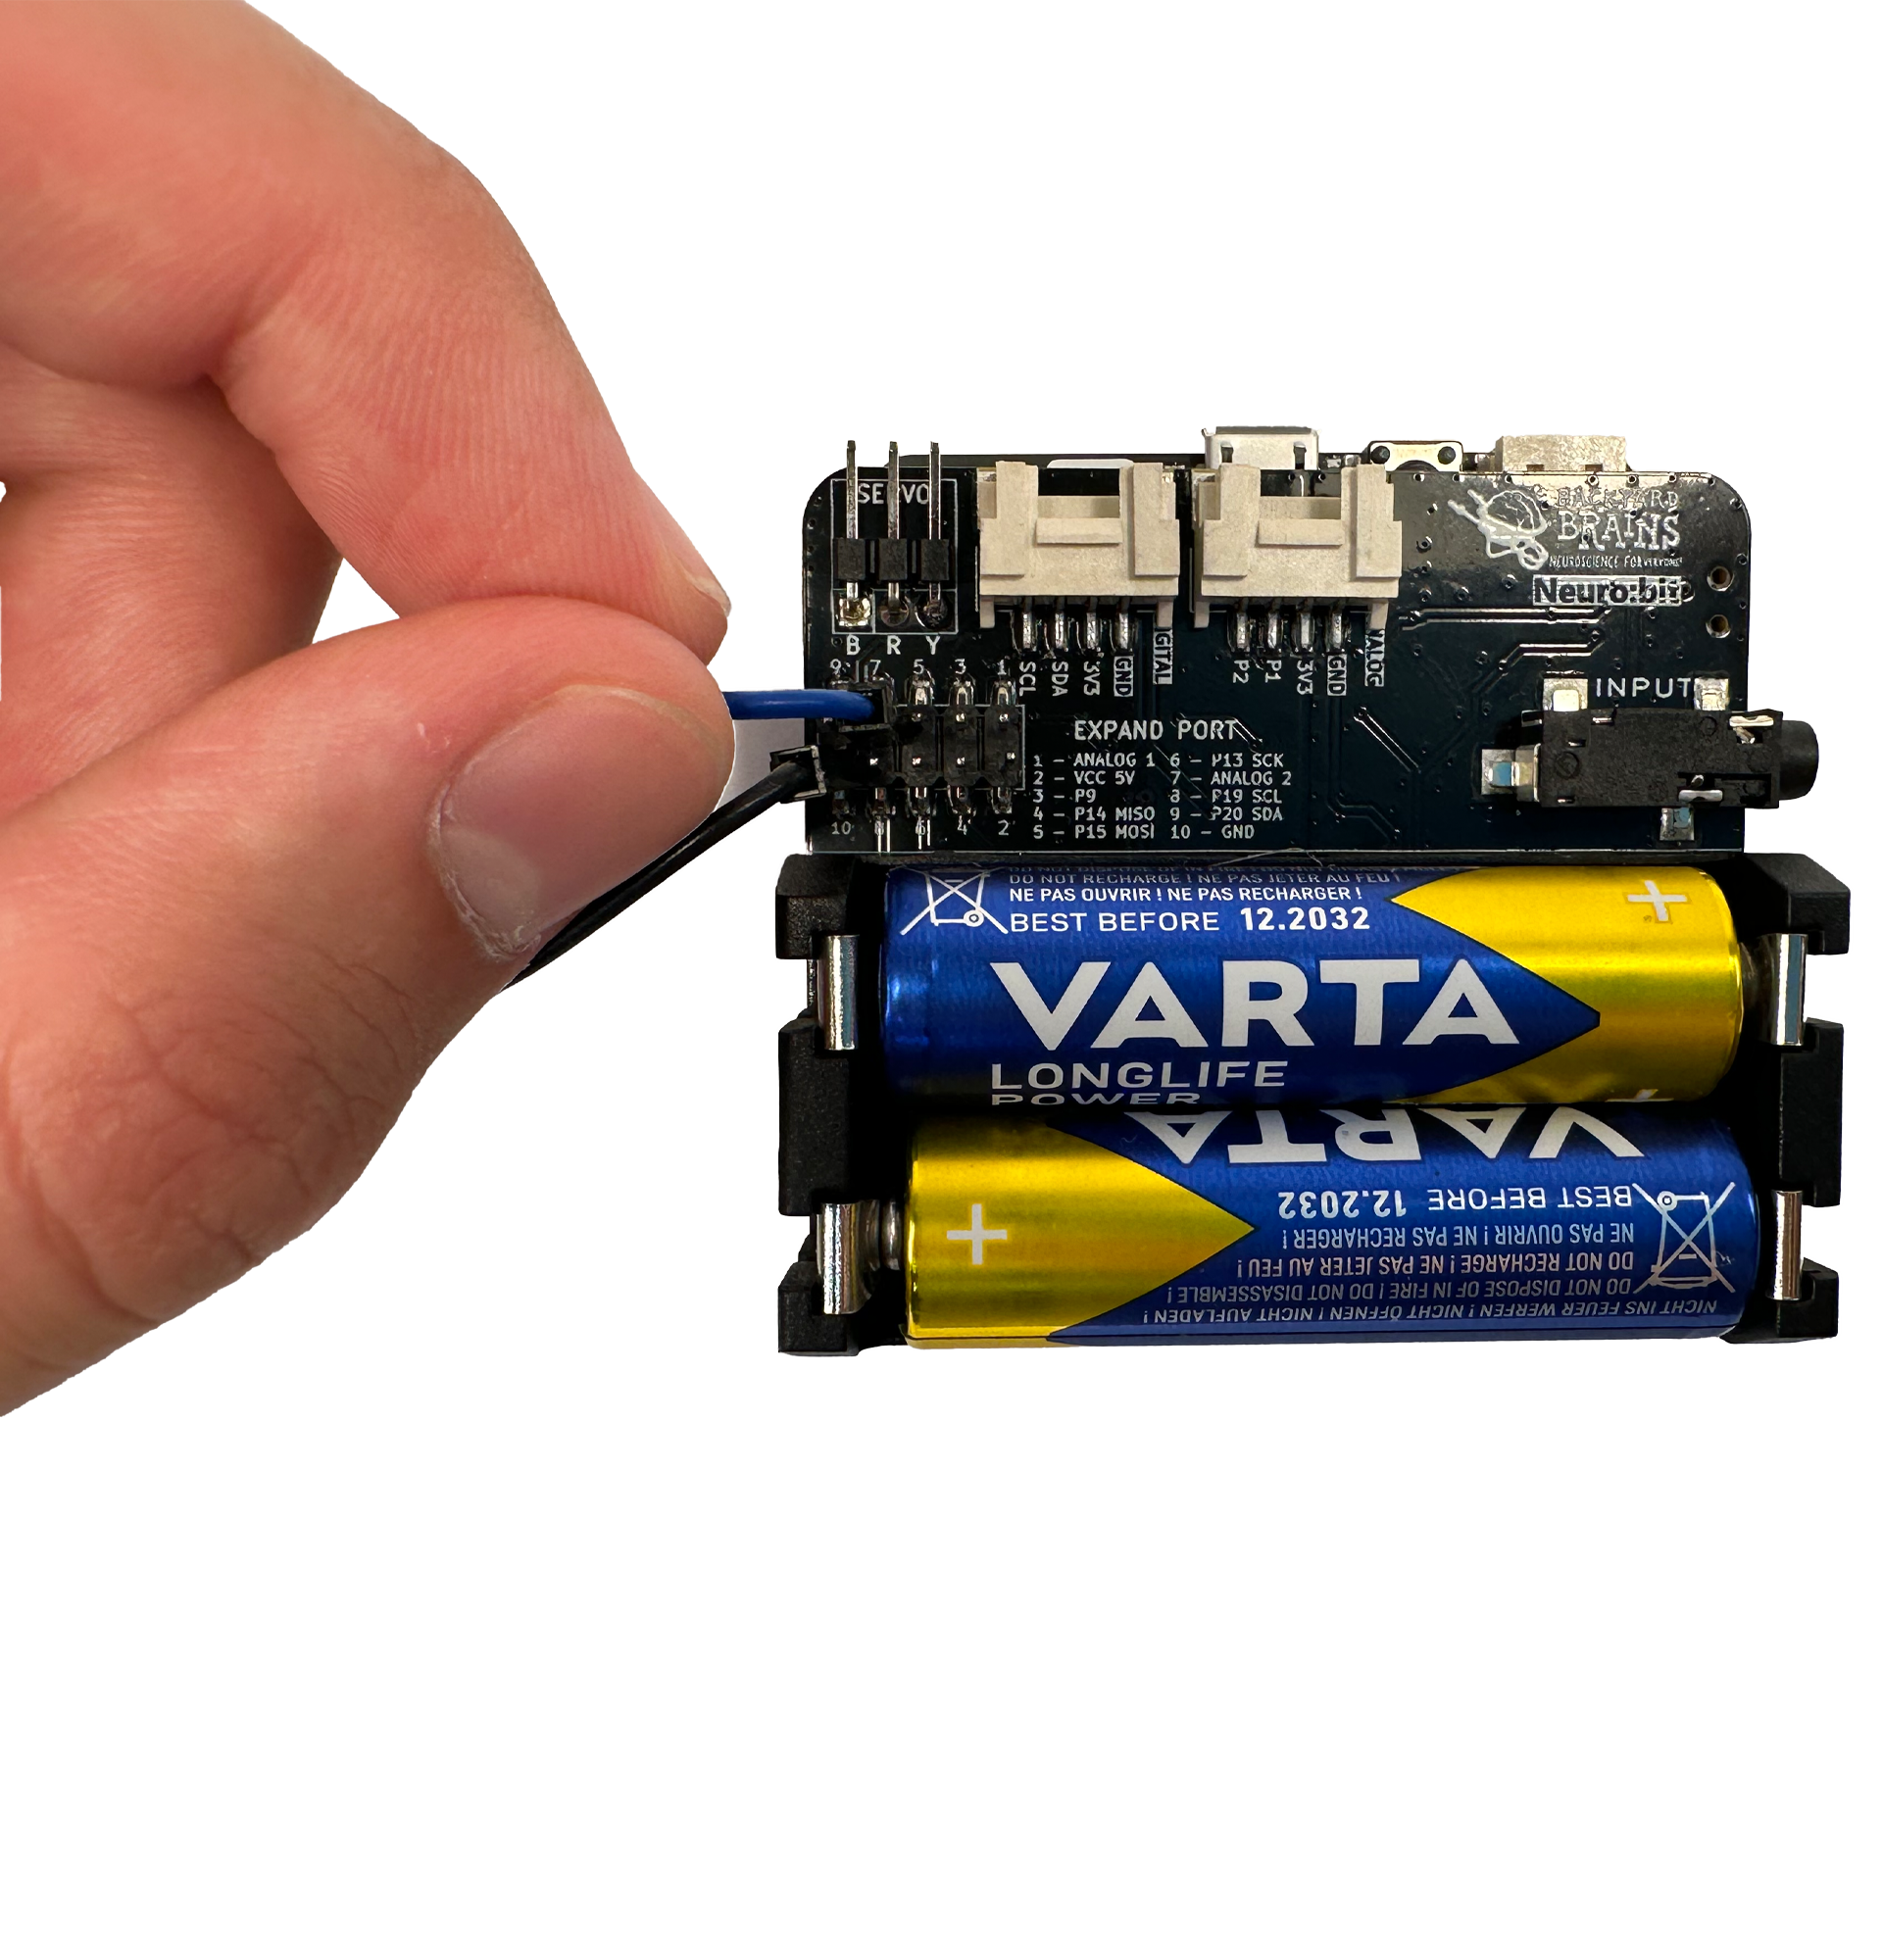
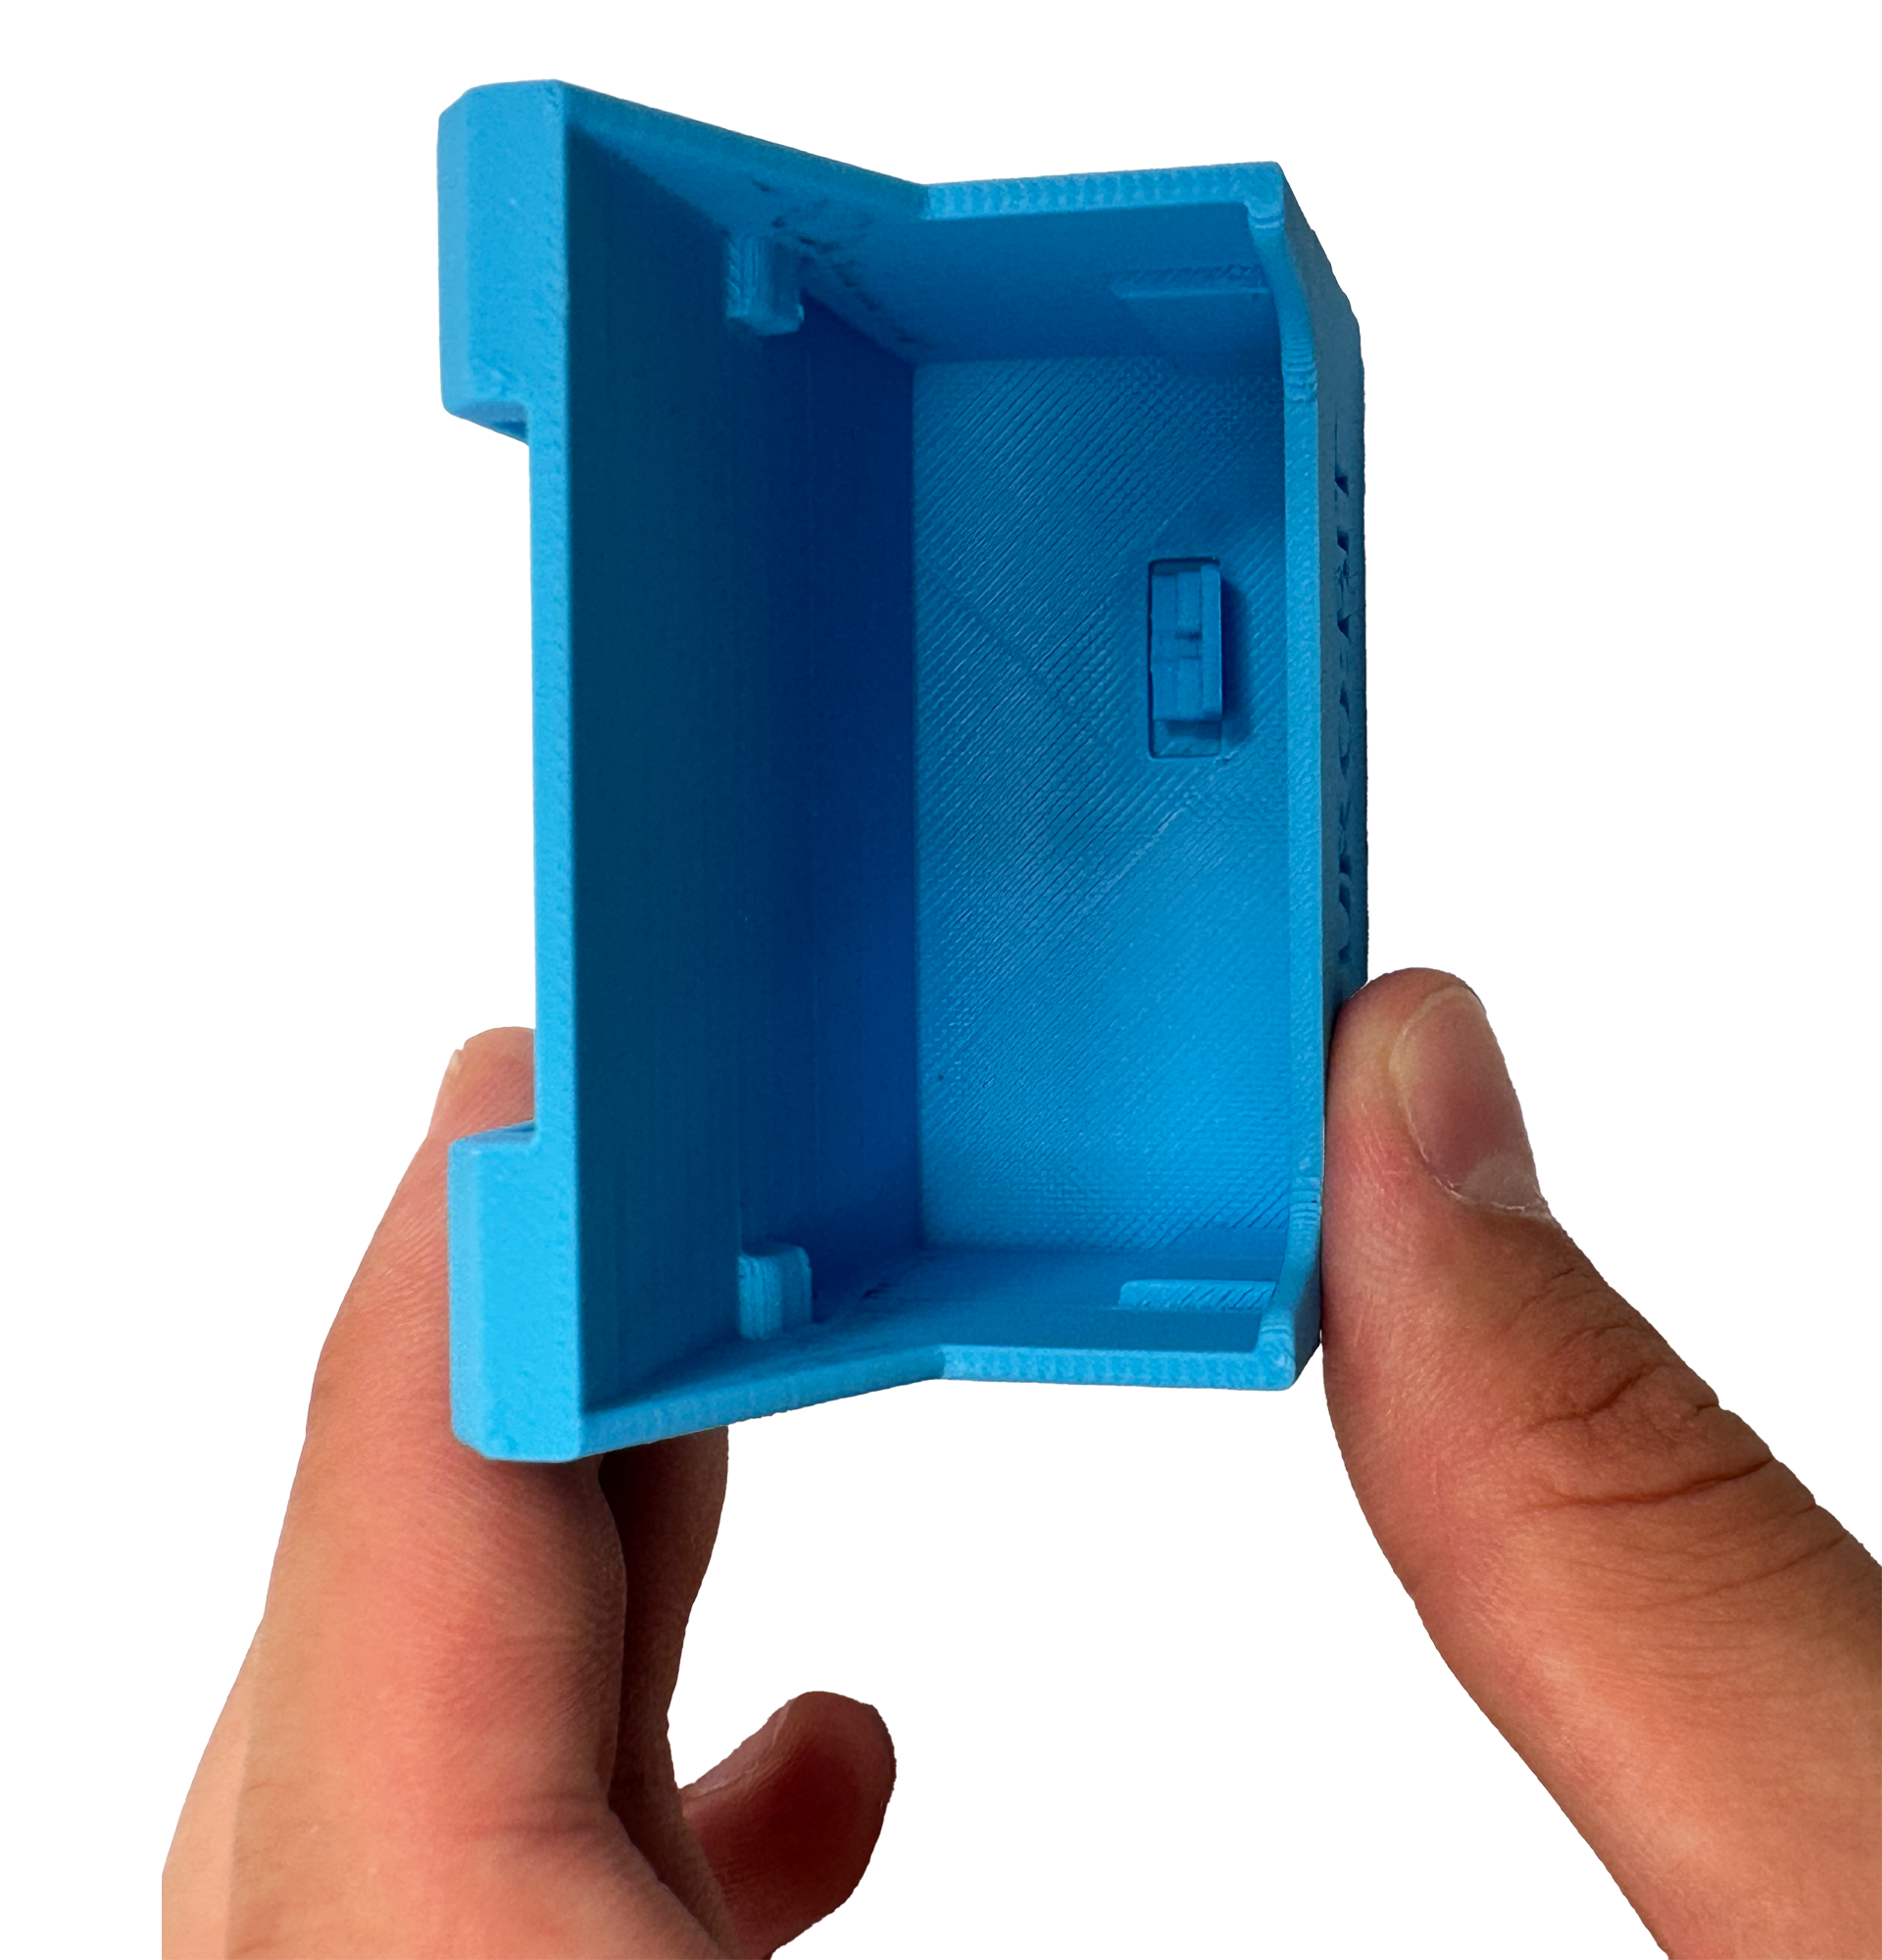
- We've also used a simple casing with a switch for our example, we recommend you also make some sort of housing device to hold the Spiker:bit in place
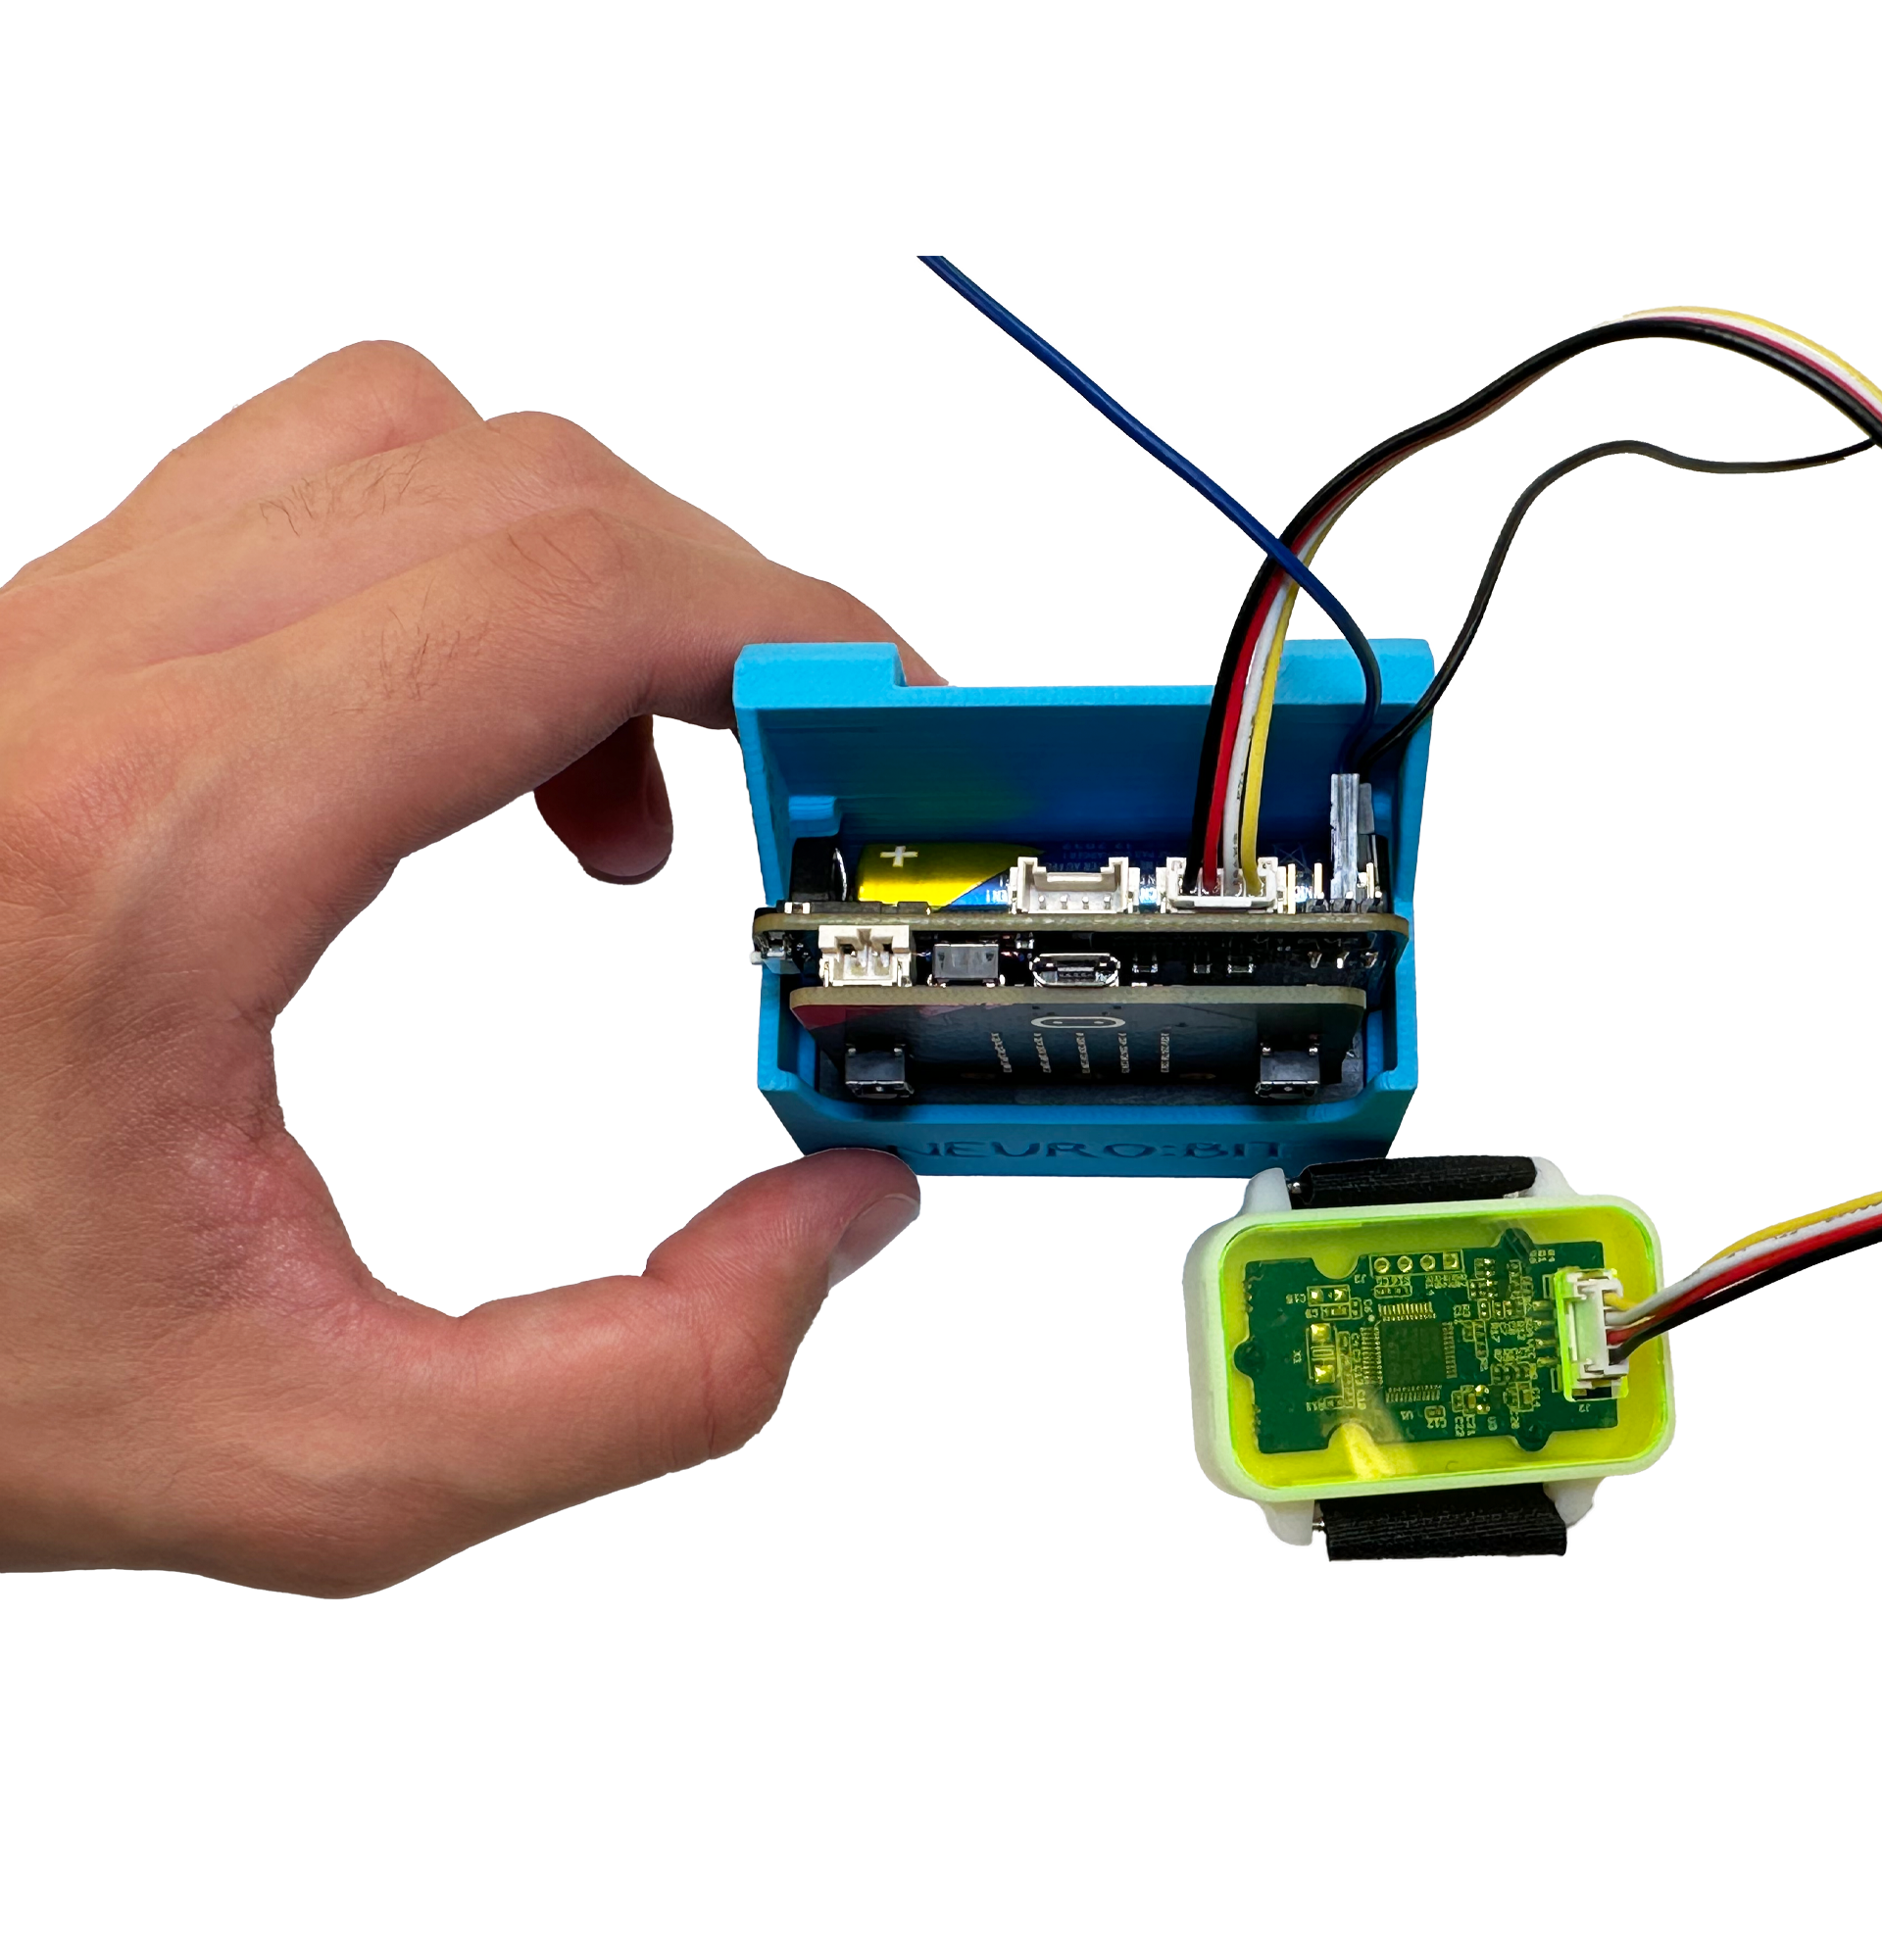
- Attach the heart monitor. We will be communicating over I2C.
- Now connect an audio jack into the speaker. This cable is a bit special, as it also has alligator clips.
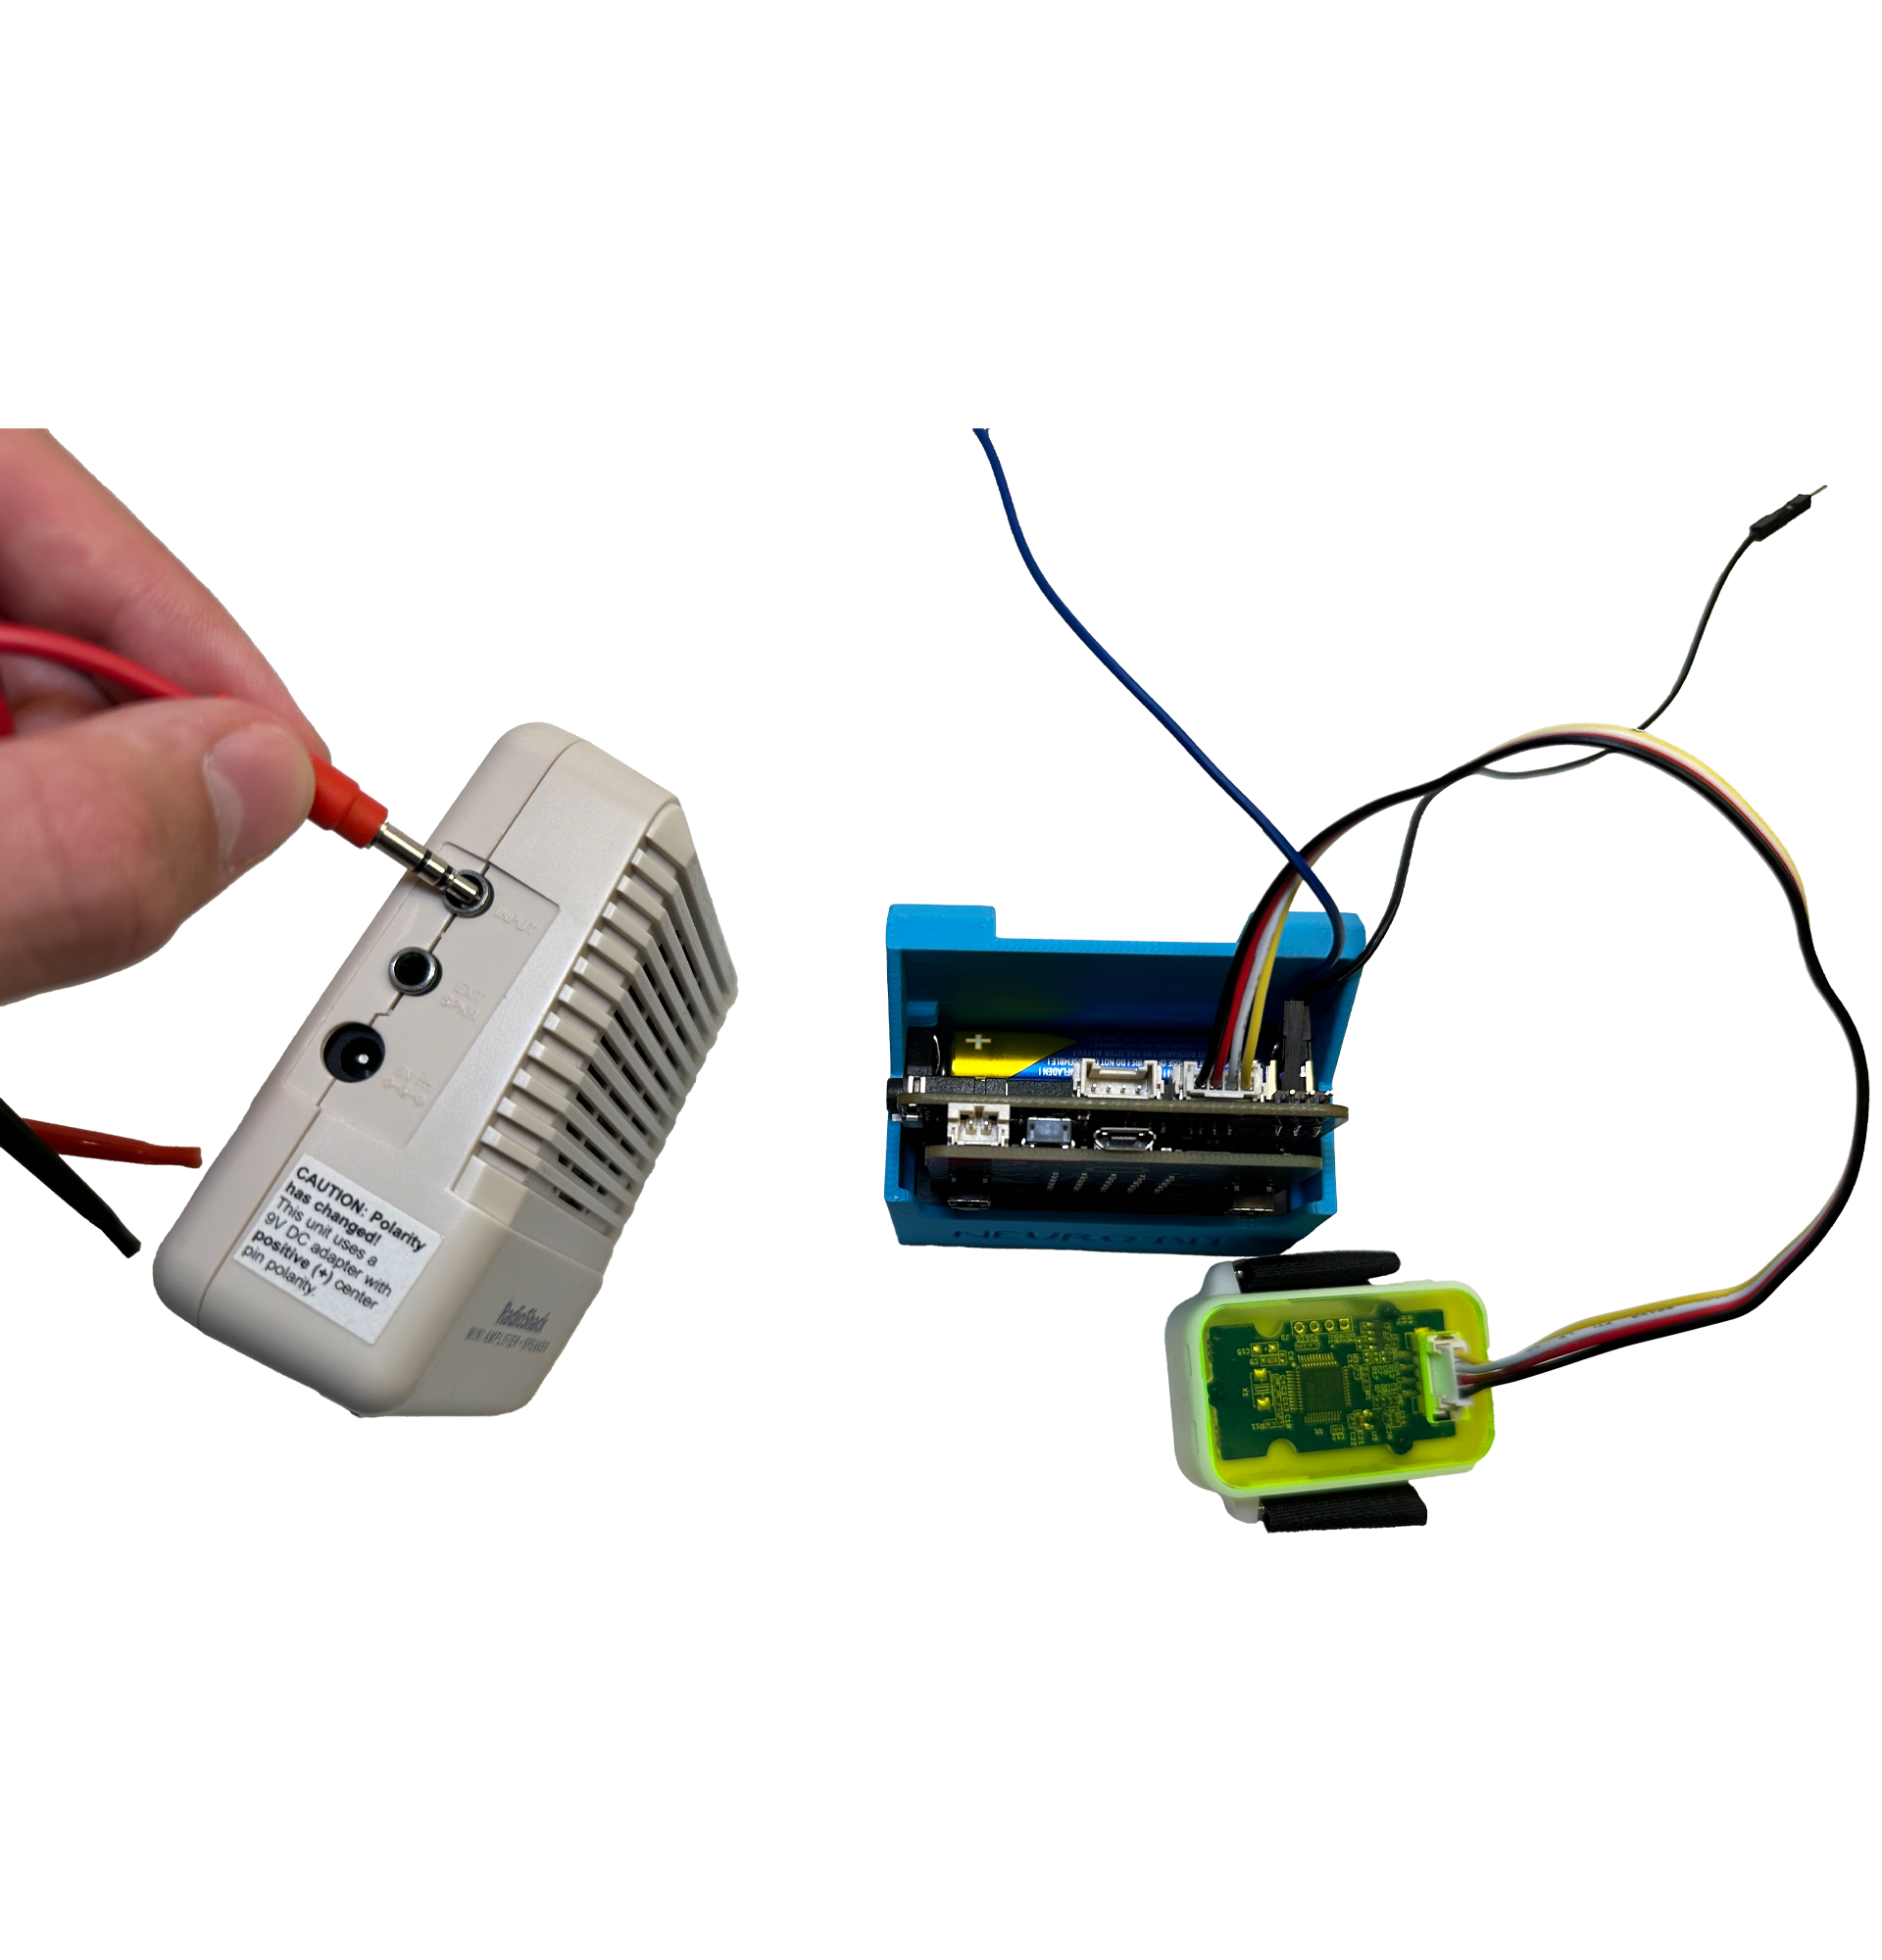
- Connect said alligator clips to our pins. Red goes to blue ( power to signal ) and black goes to black ( ground connects to ground )
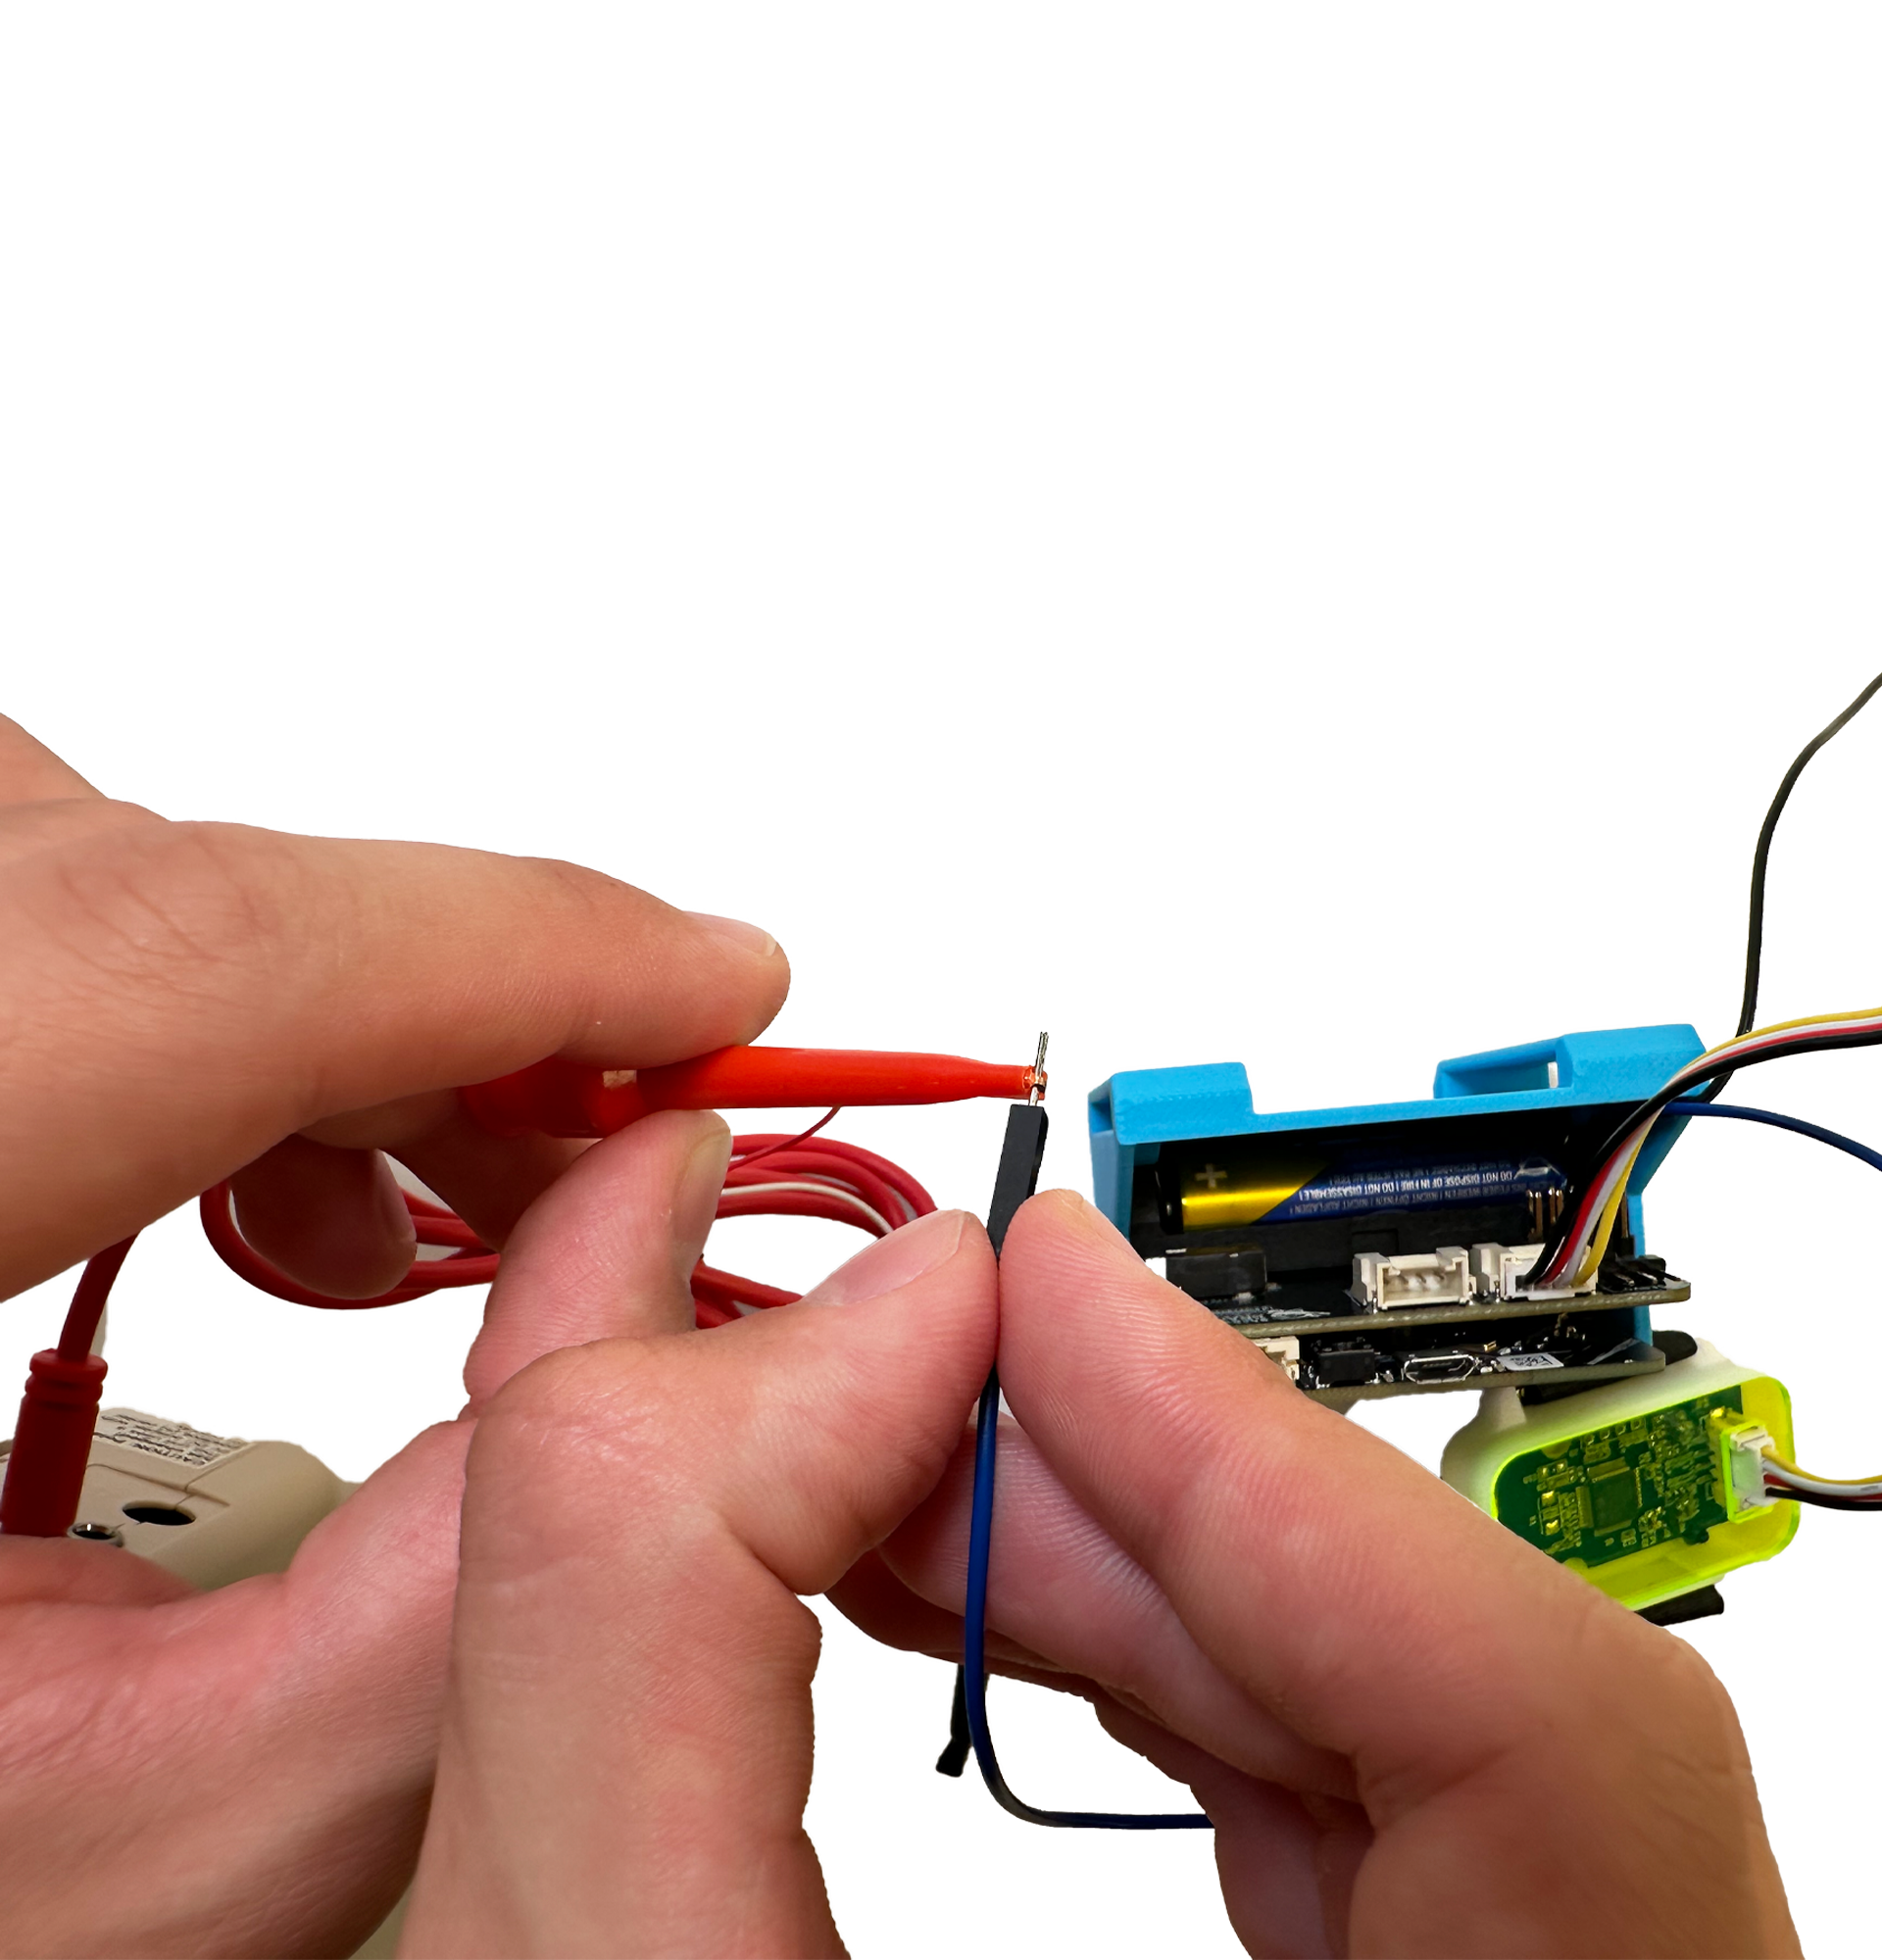
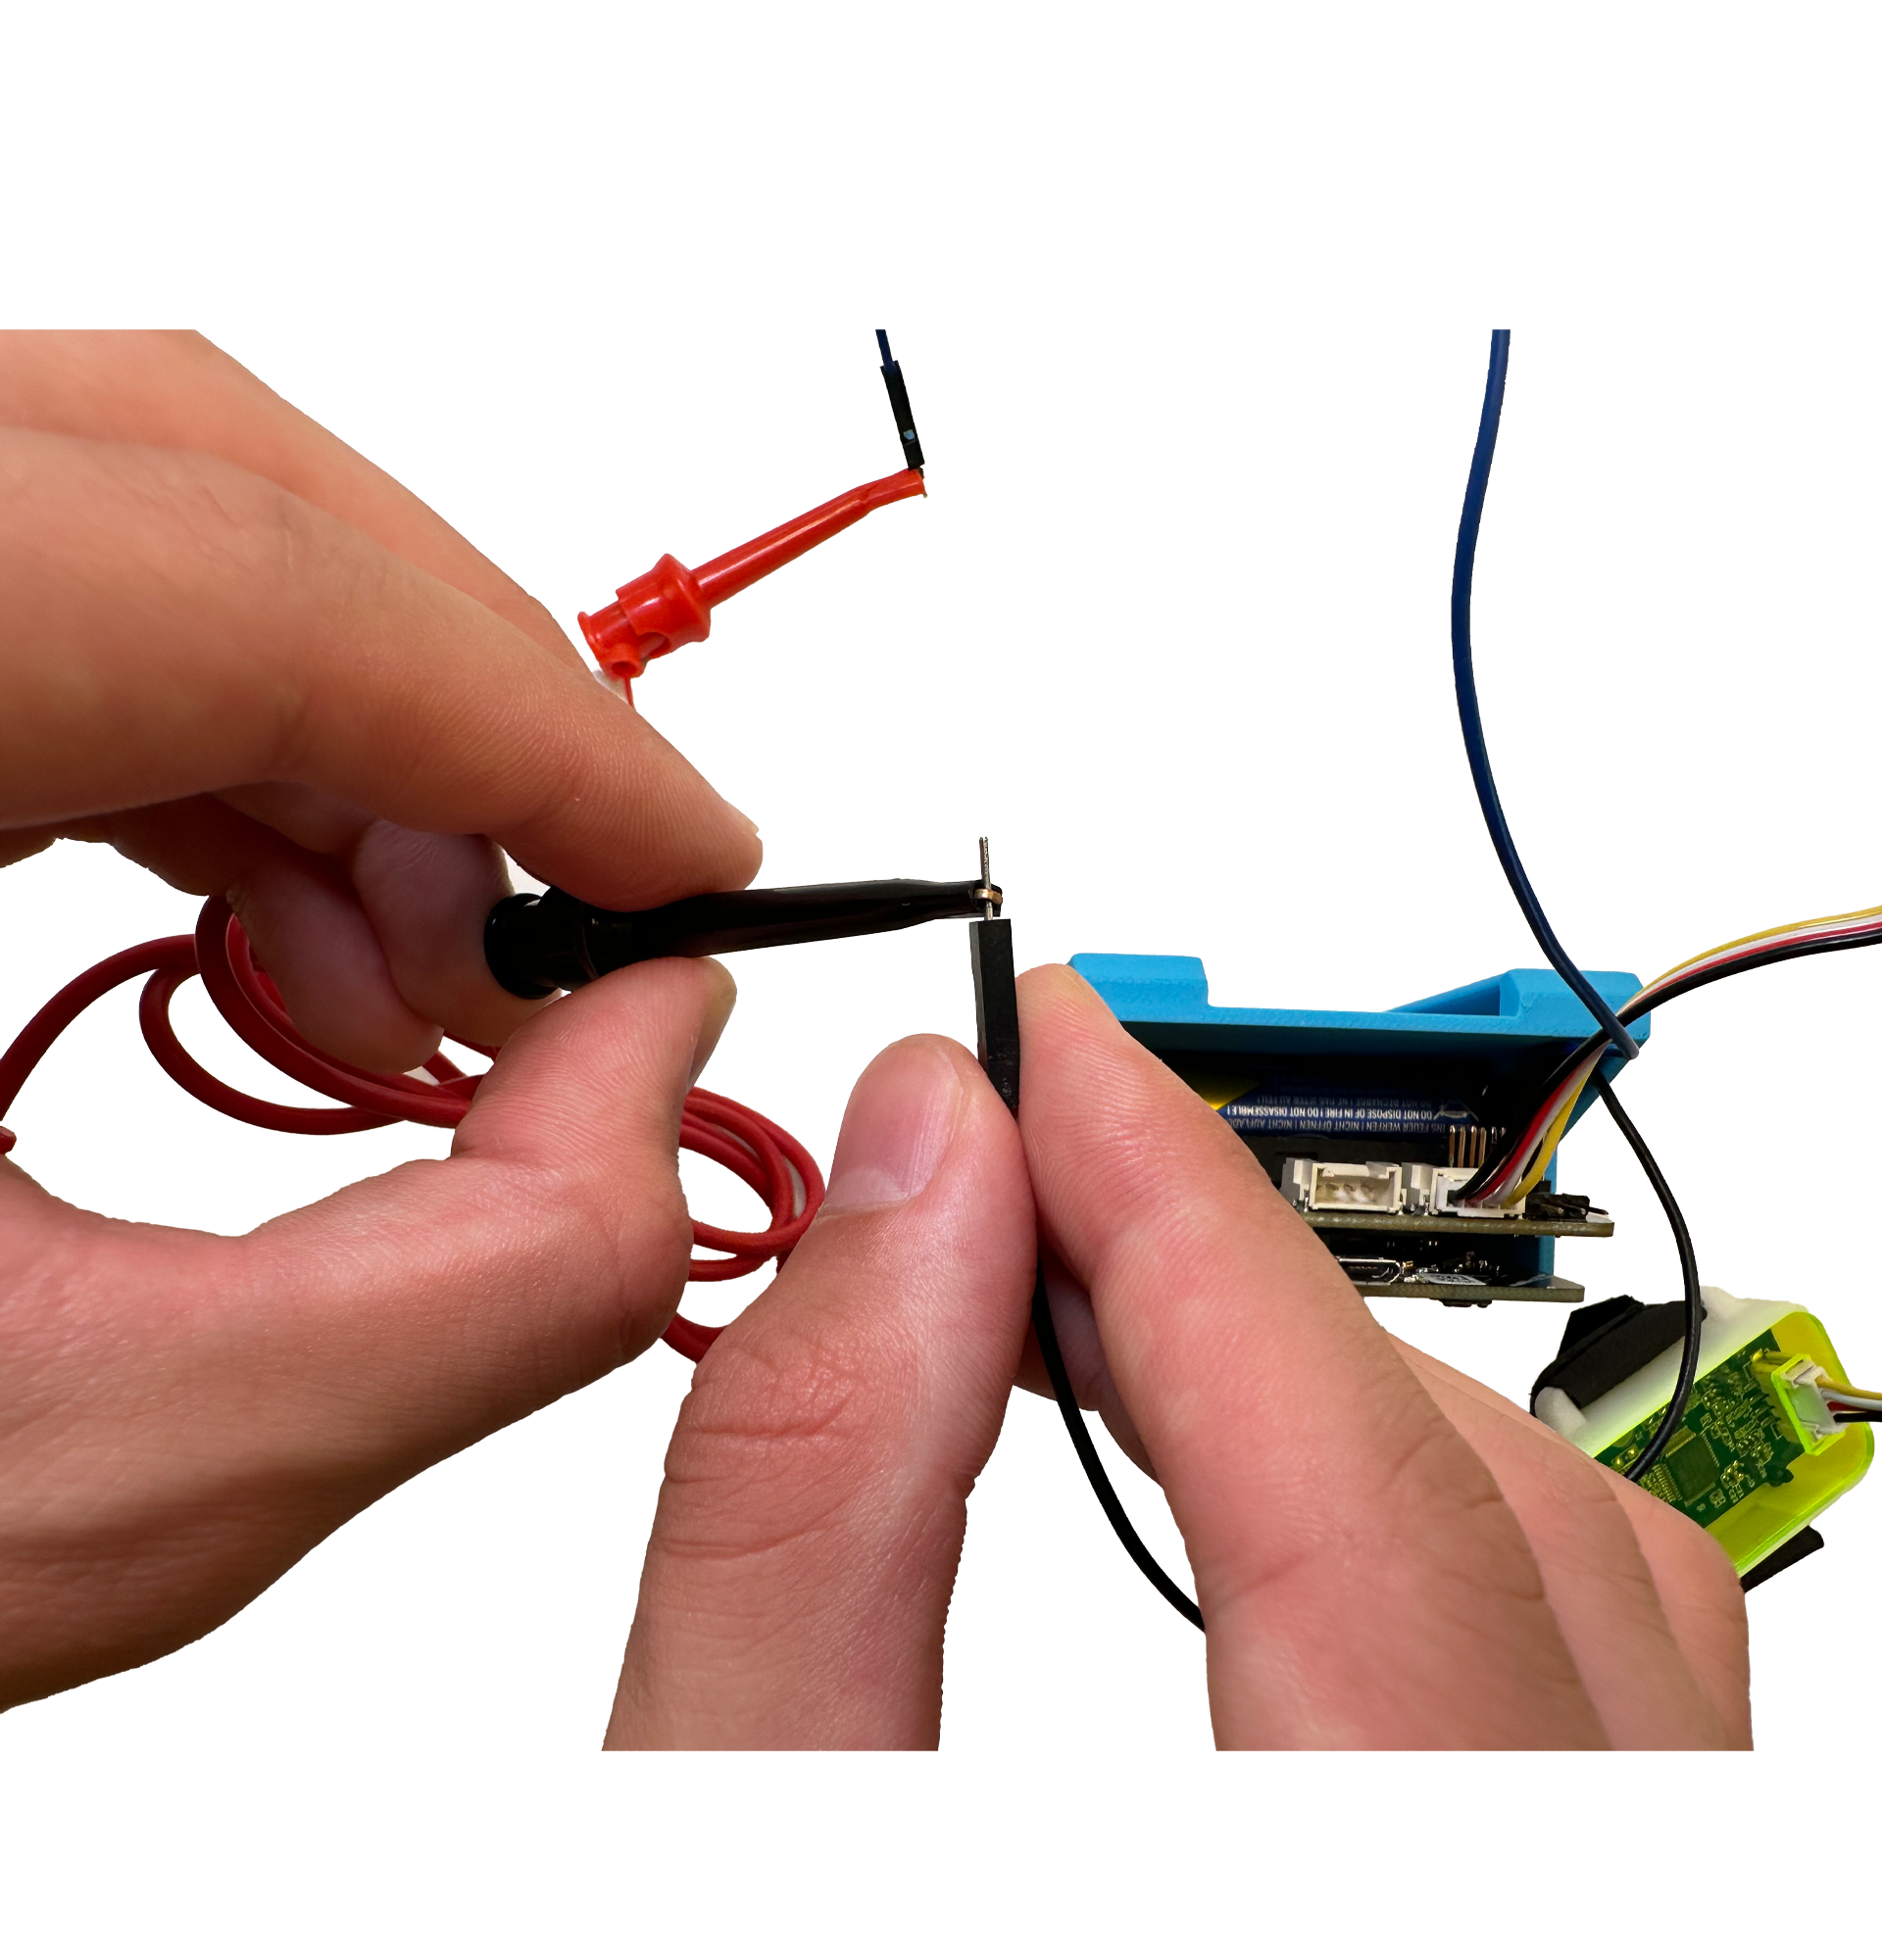
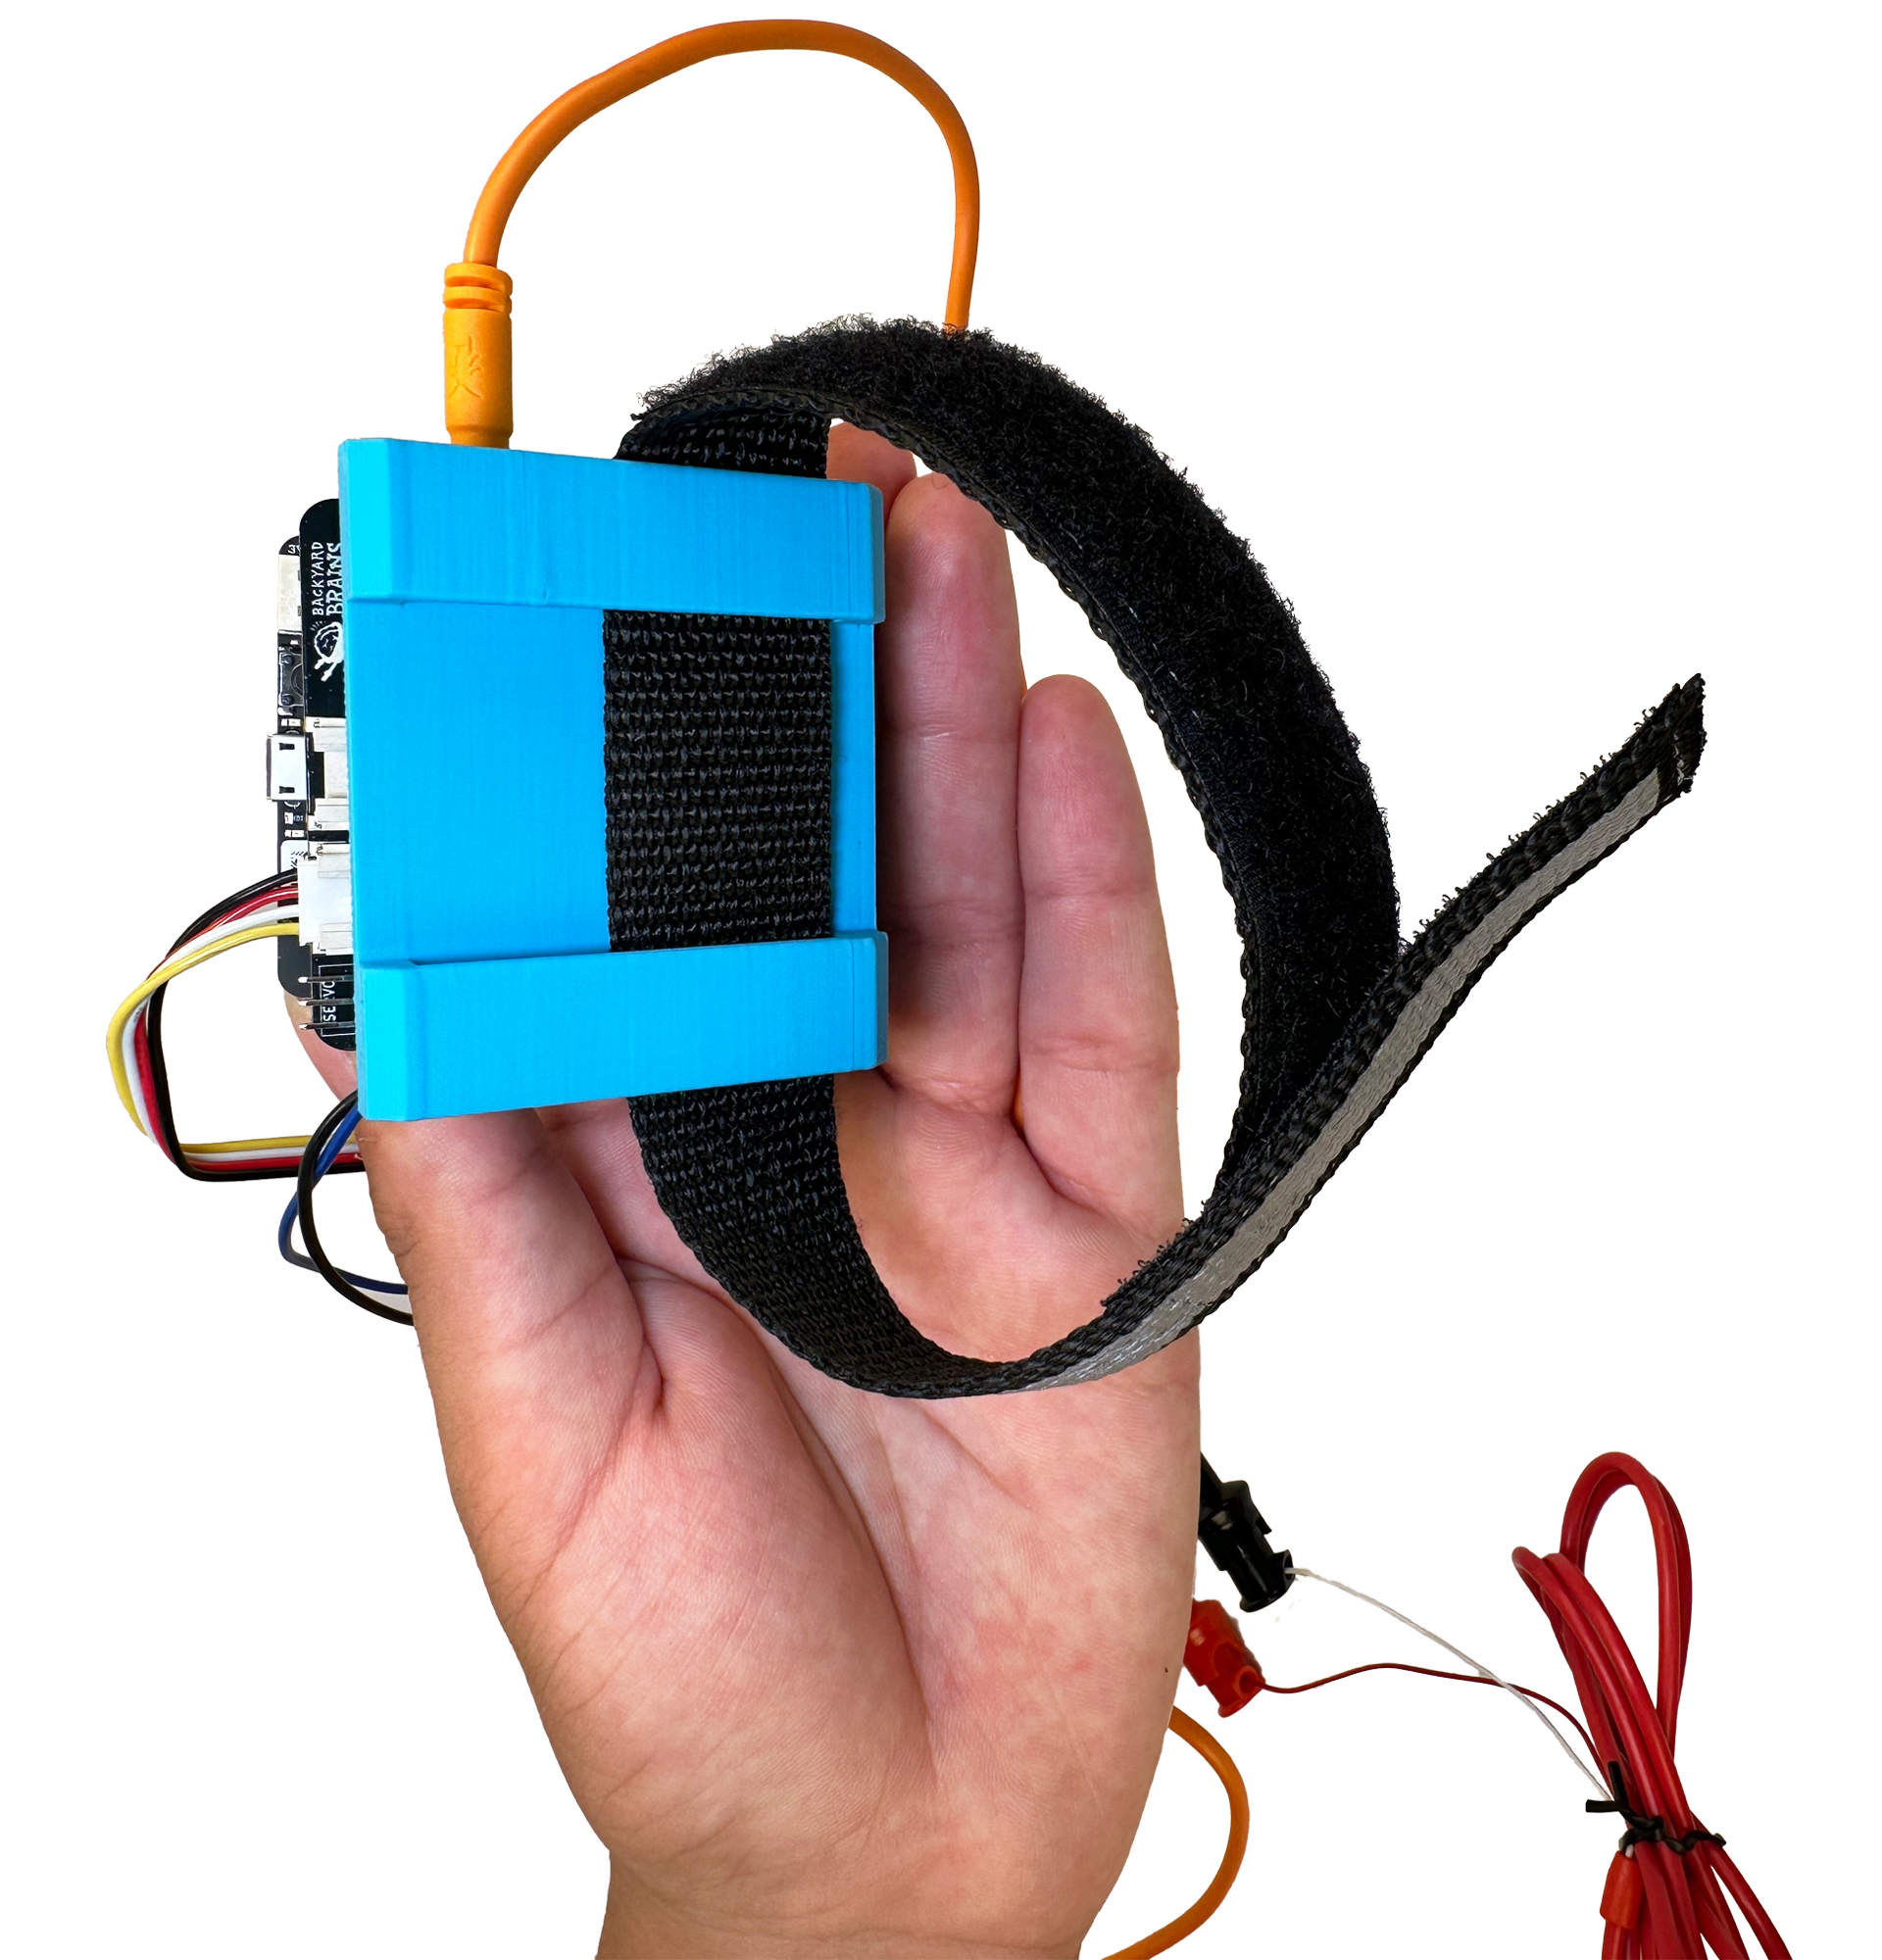
- At this point, you can connect yourself to the Spiker:bit.
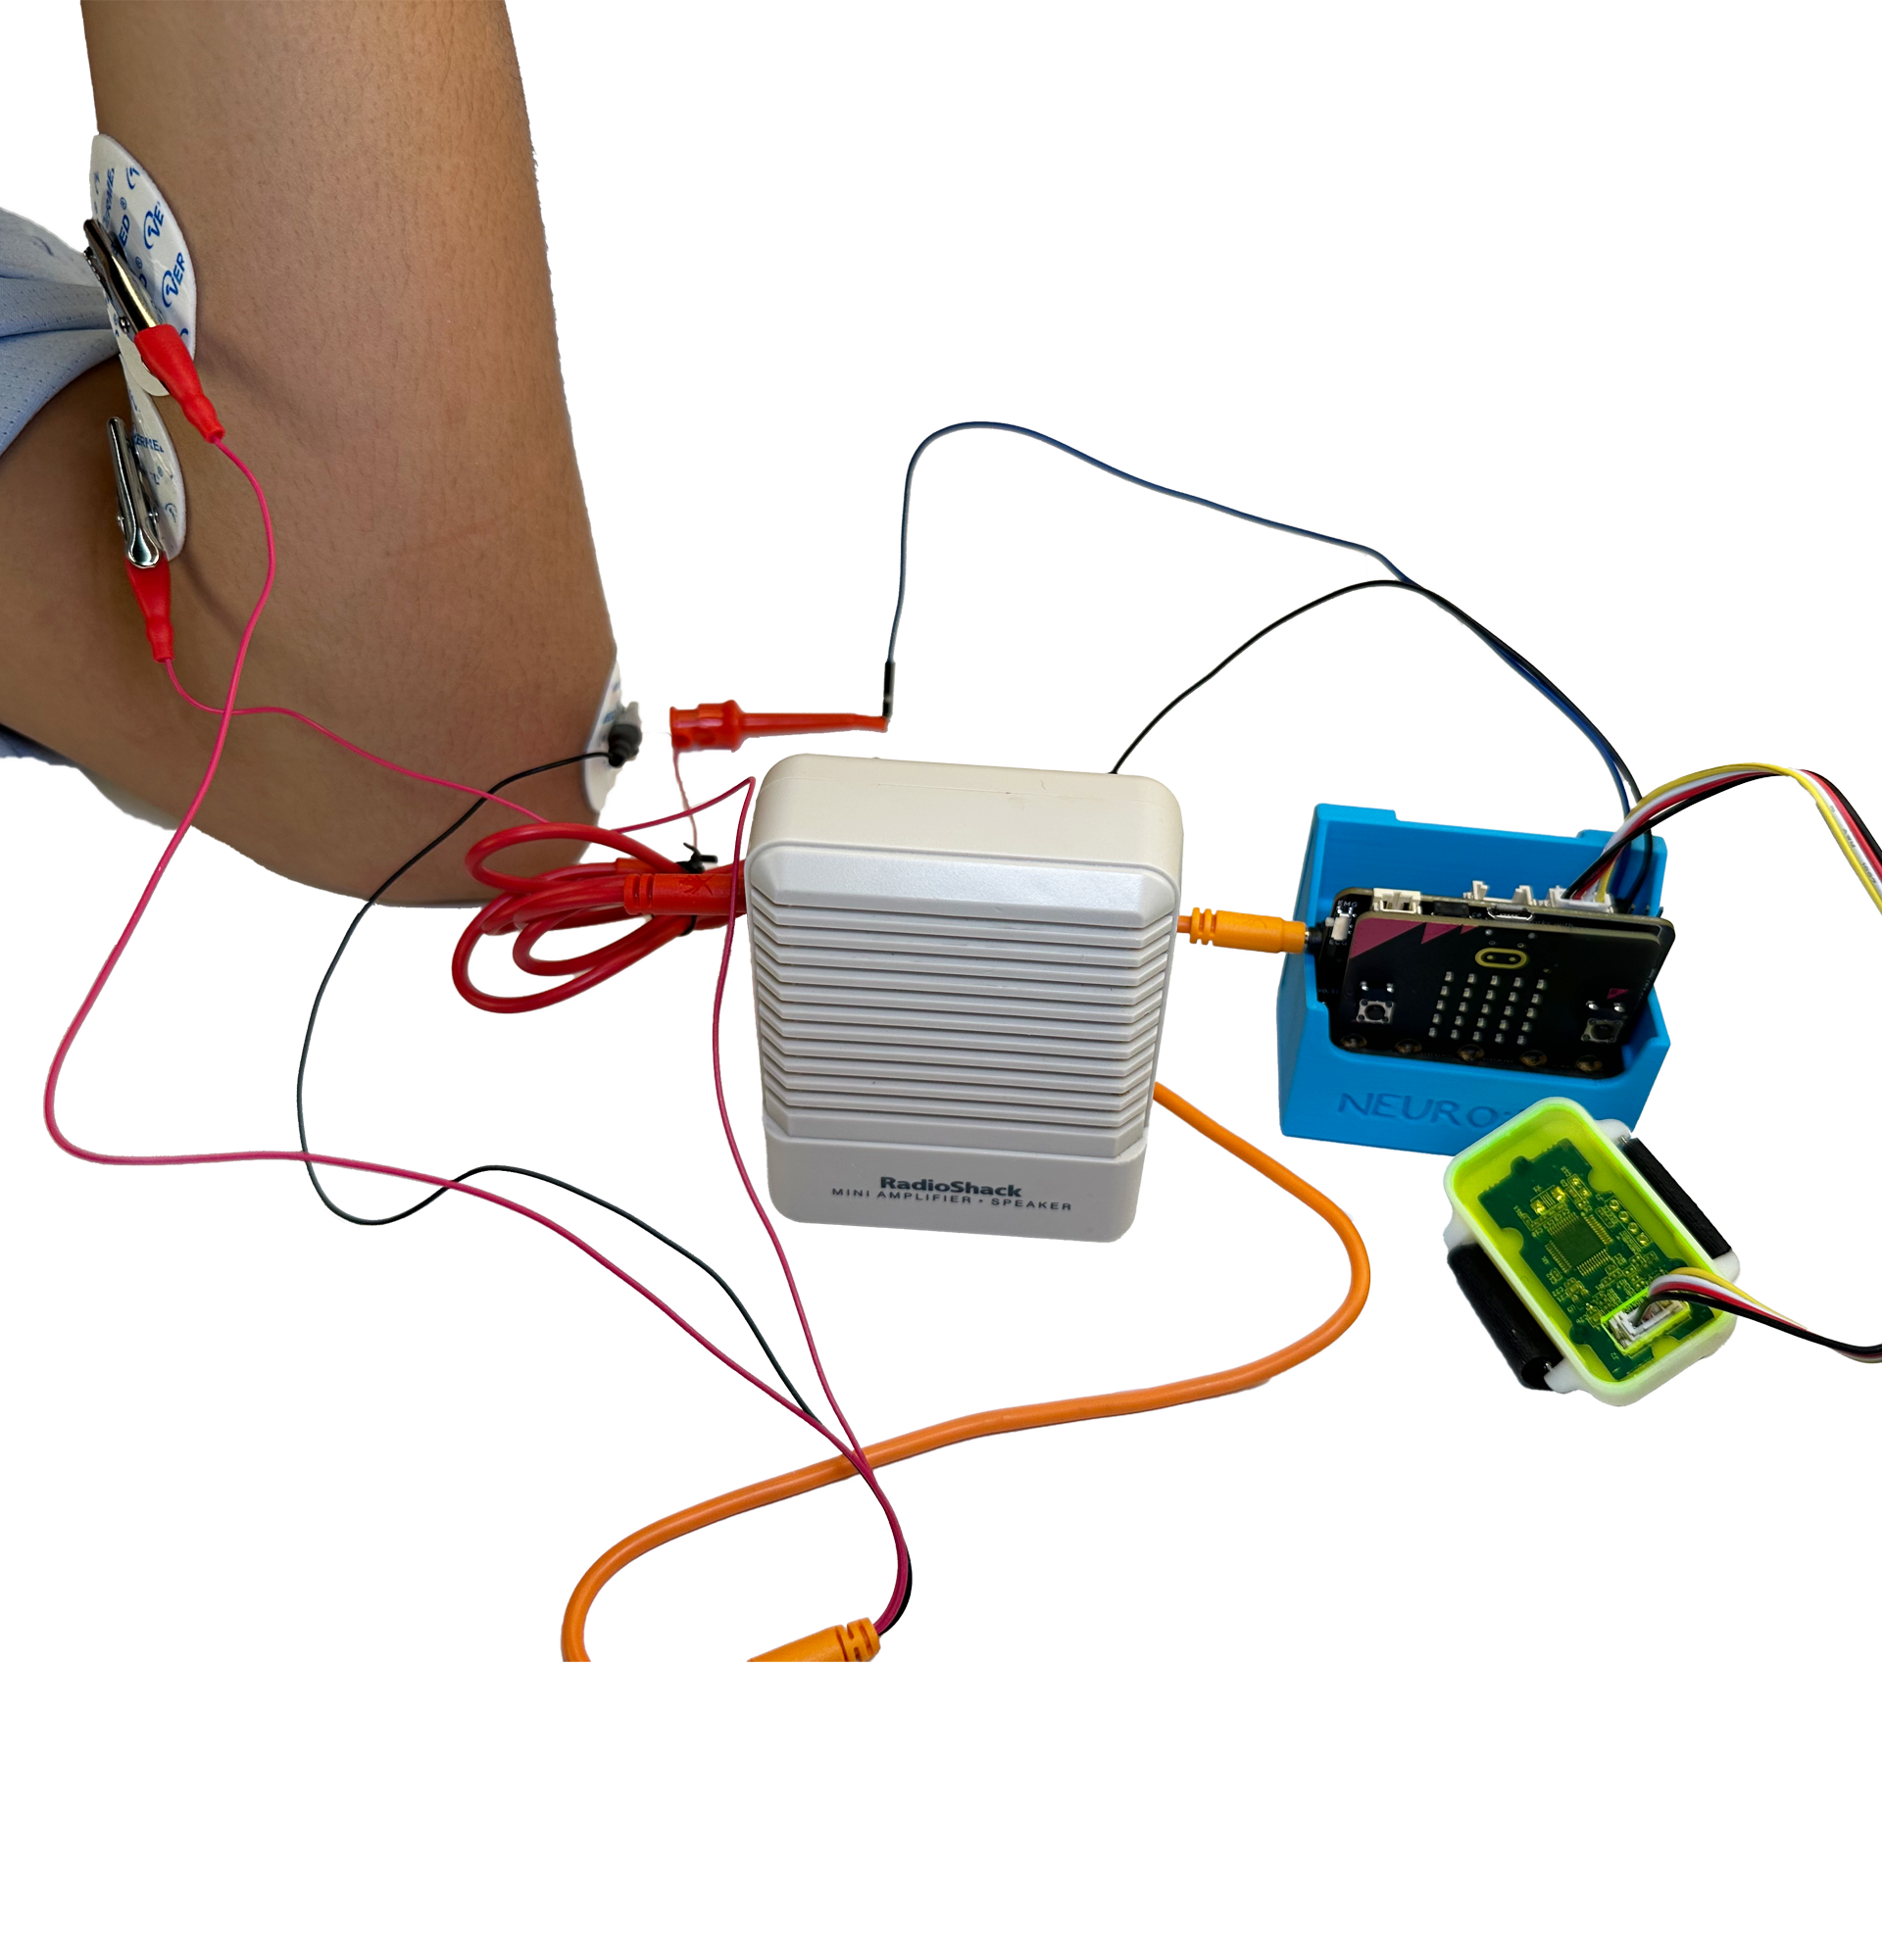
- If you have a strap, you can also attach the Spiker:bit box to your wrist, thus allowing for (mostly) hands-free control
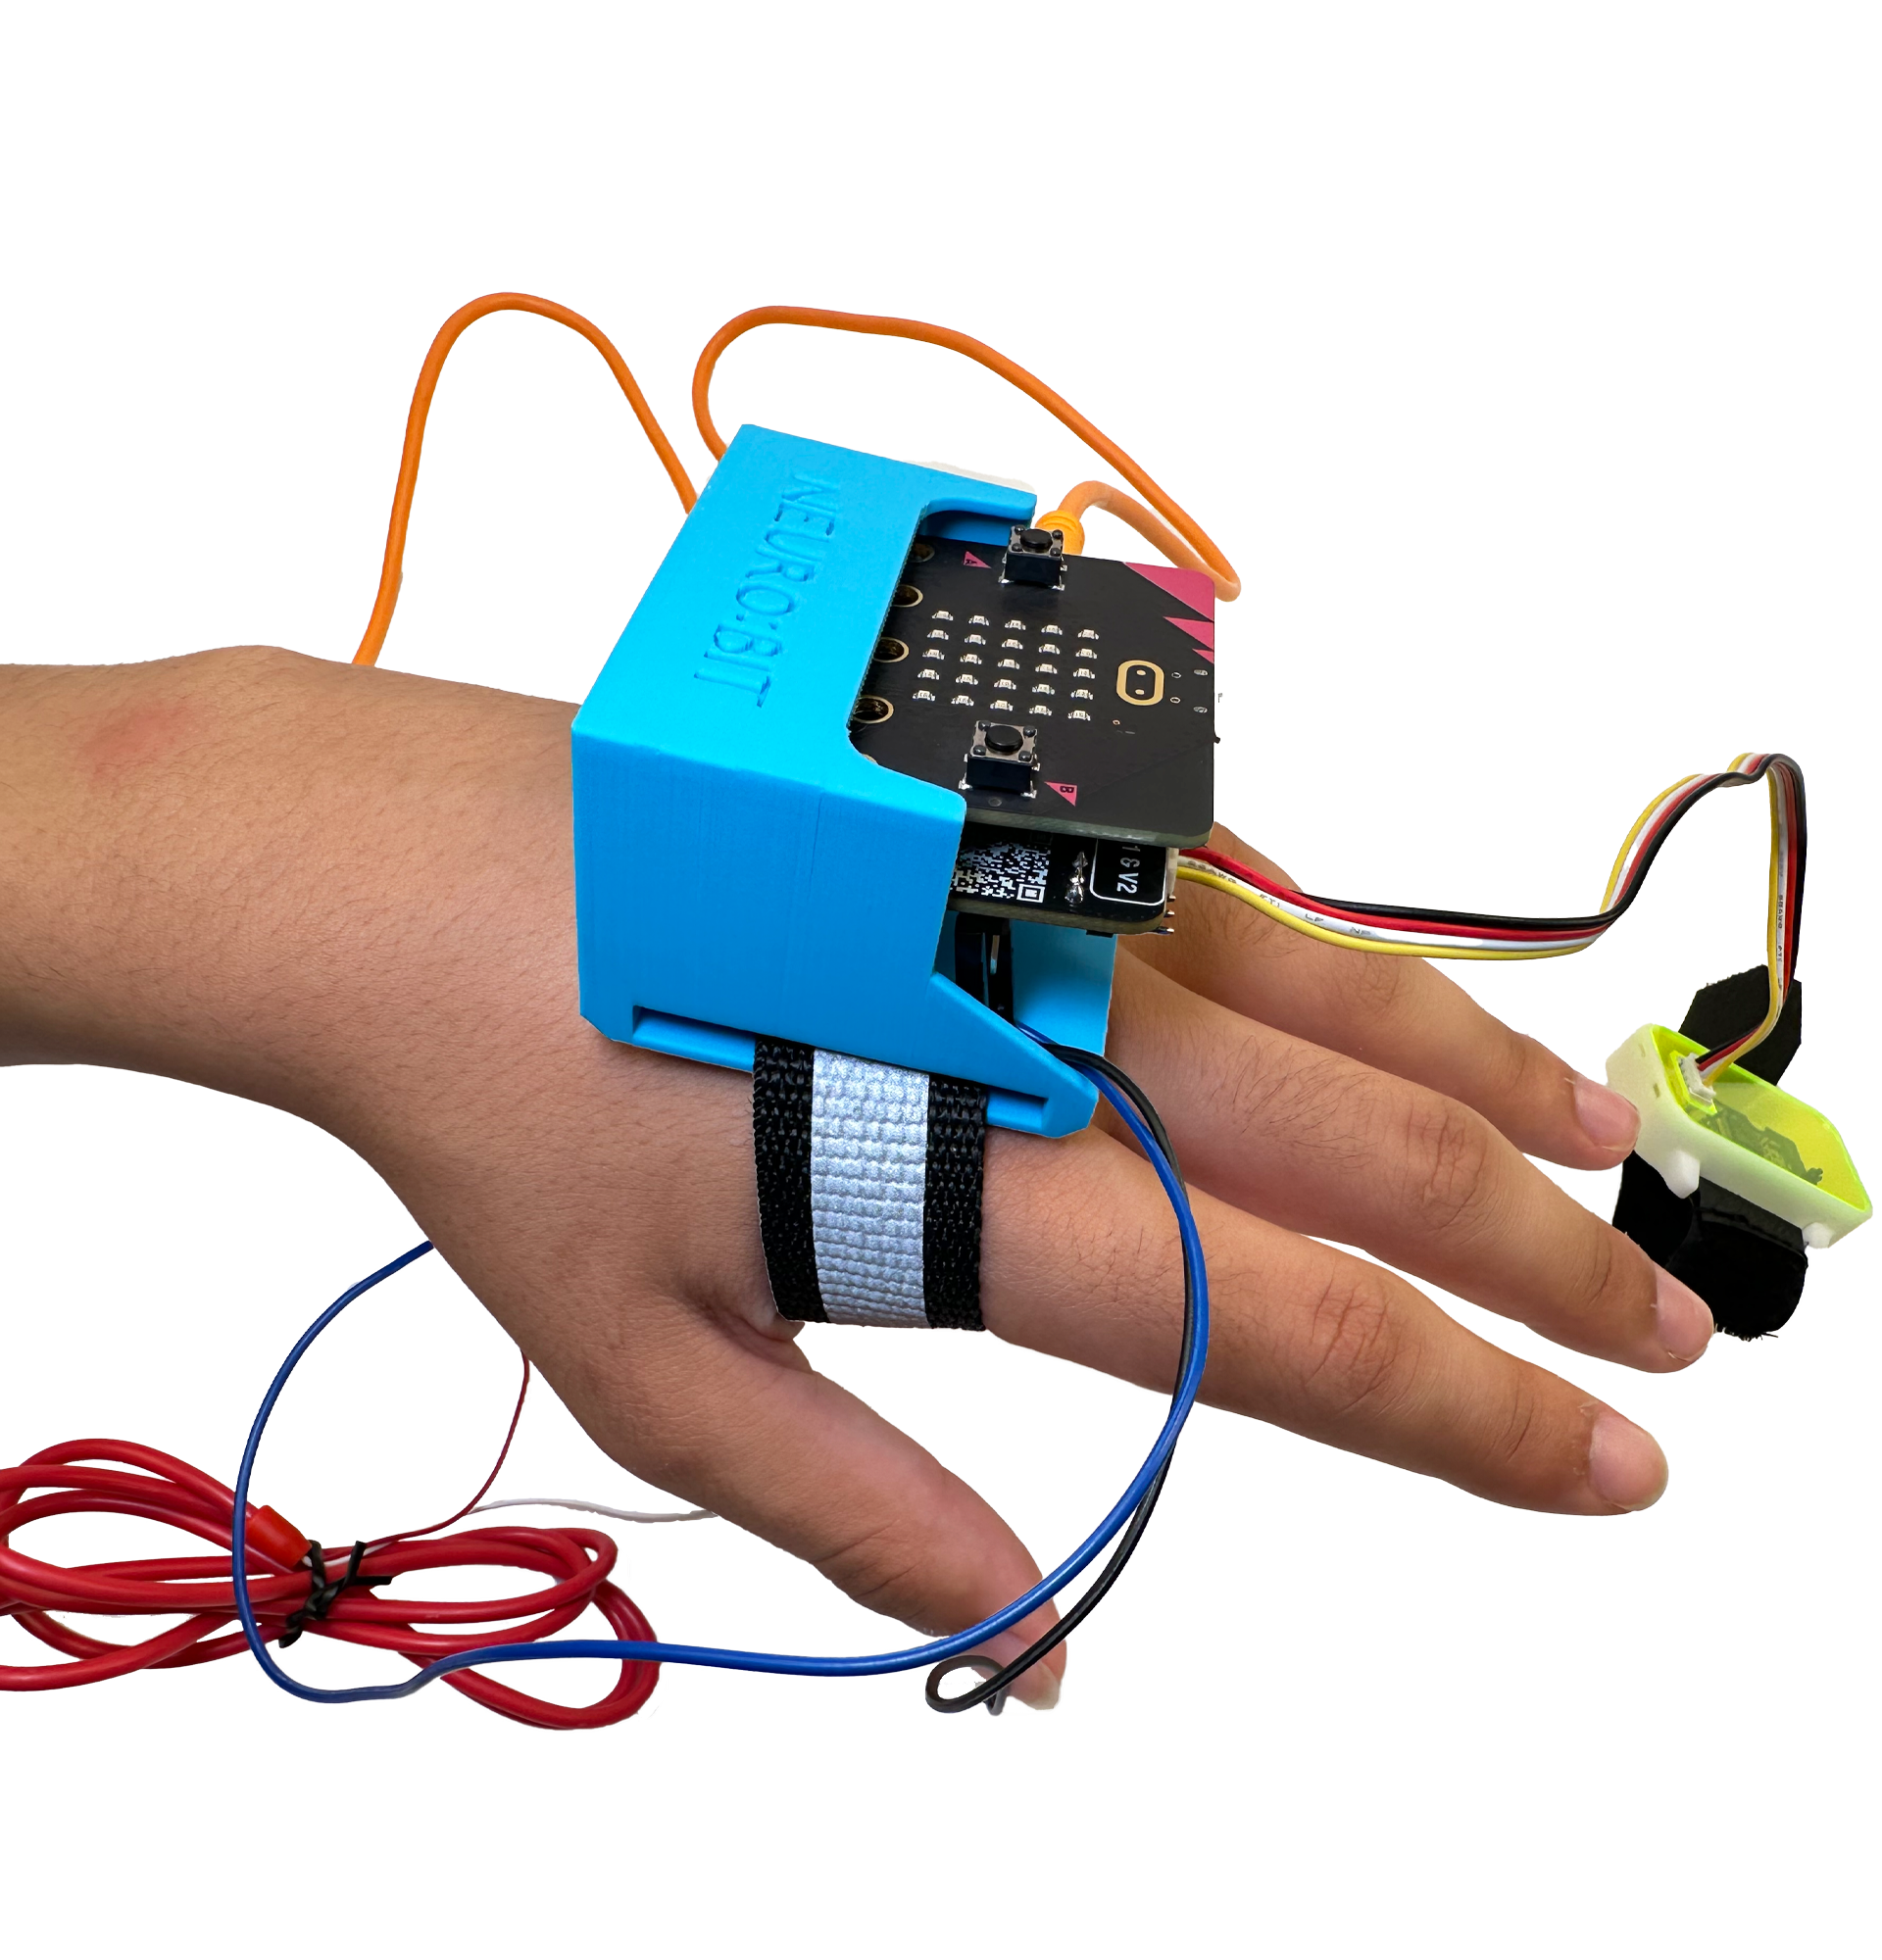
- Finally, make sure to attach the heart monitor to your finger. We recommend the index finger.
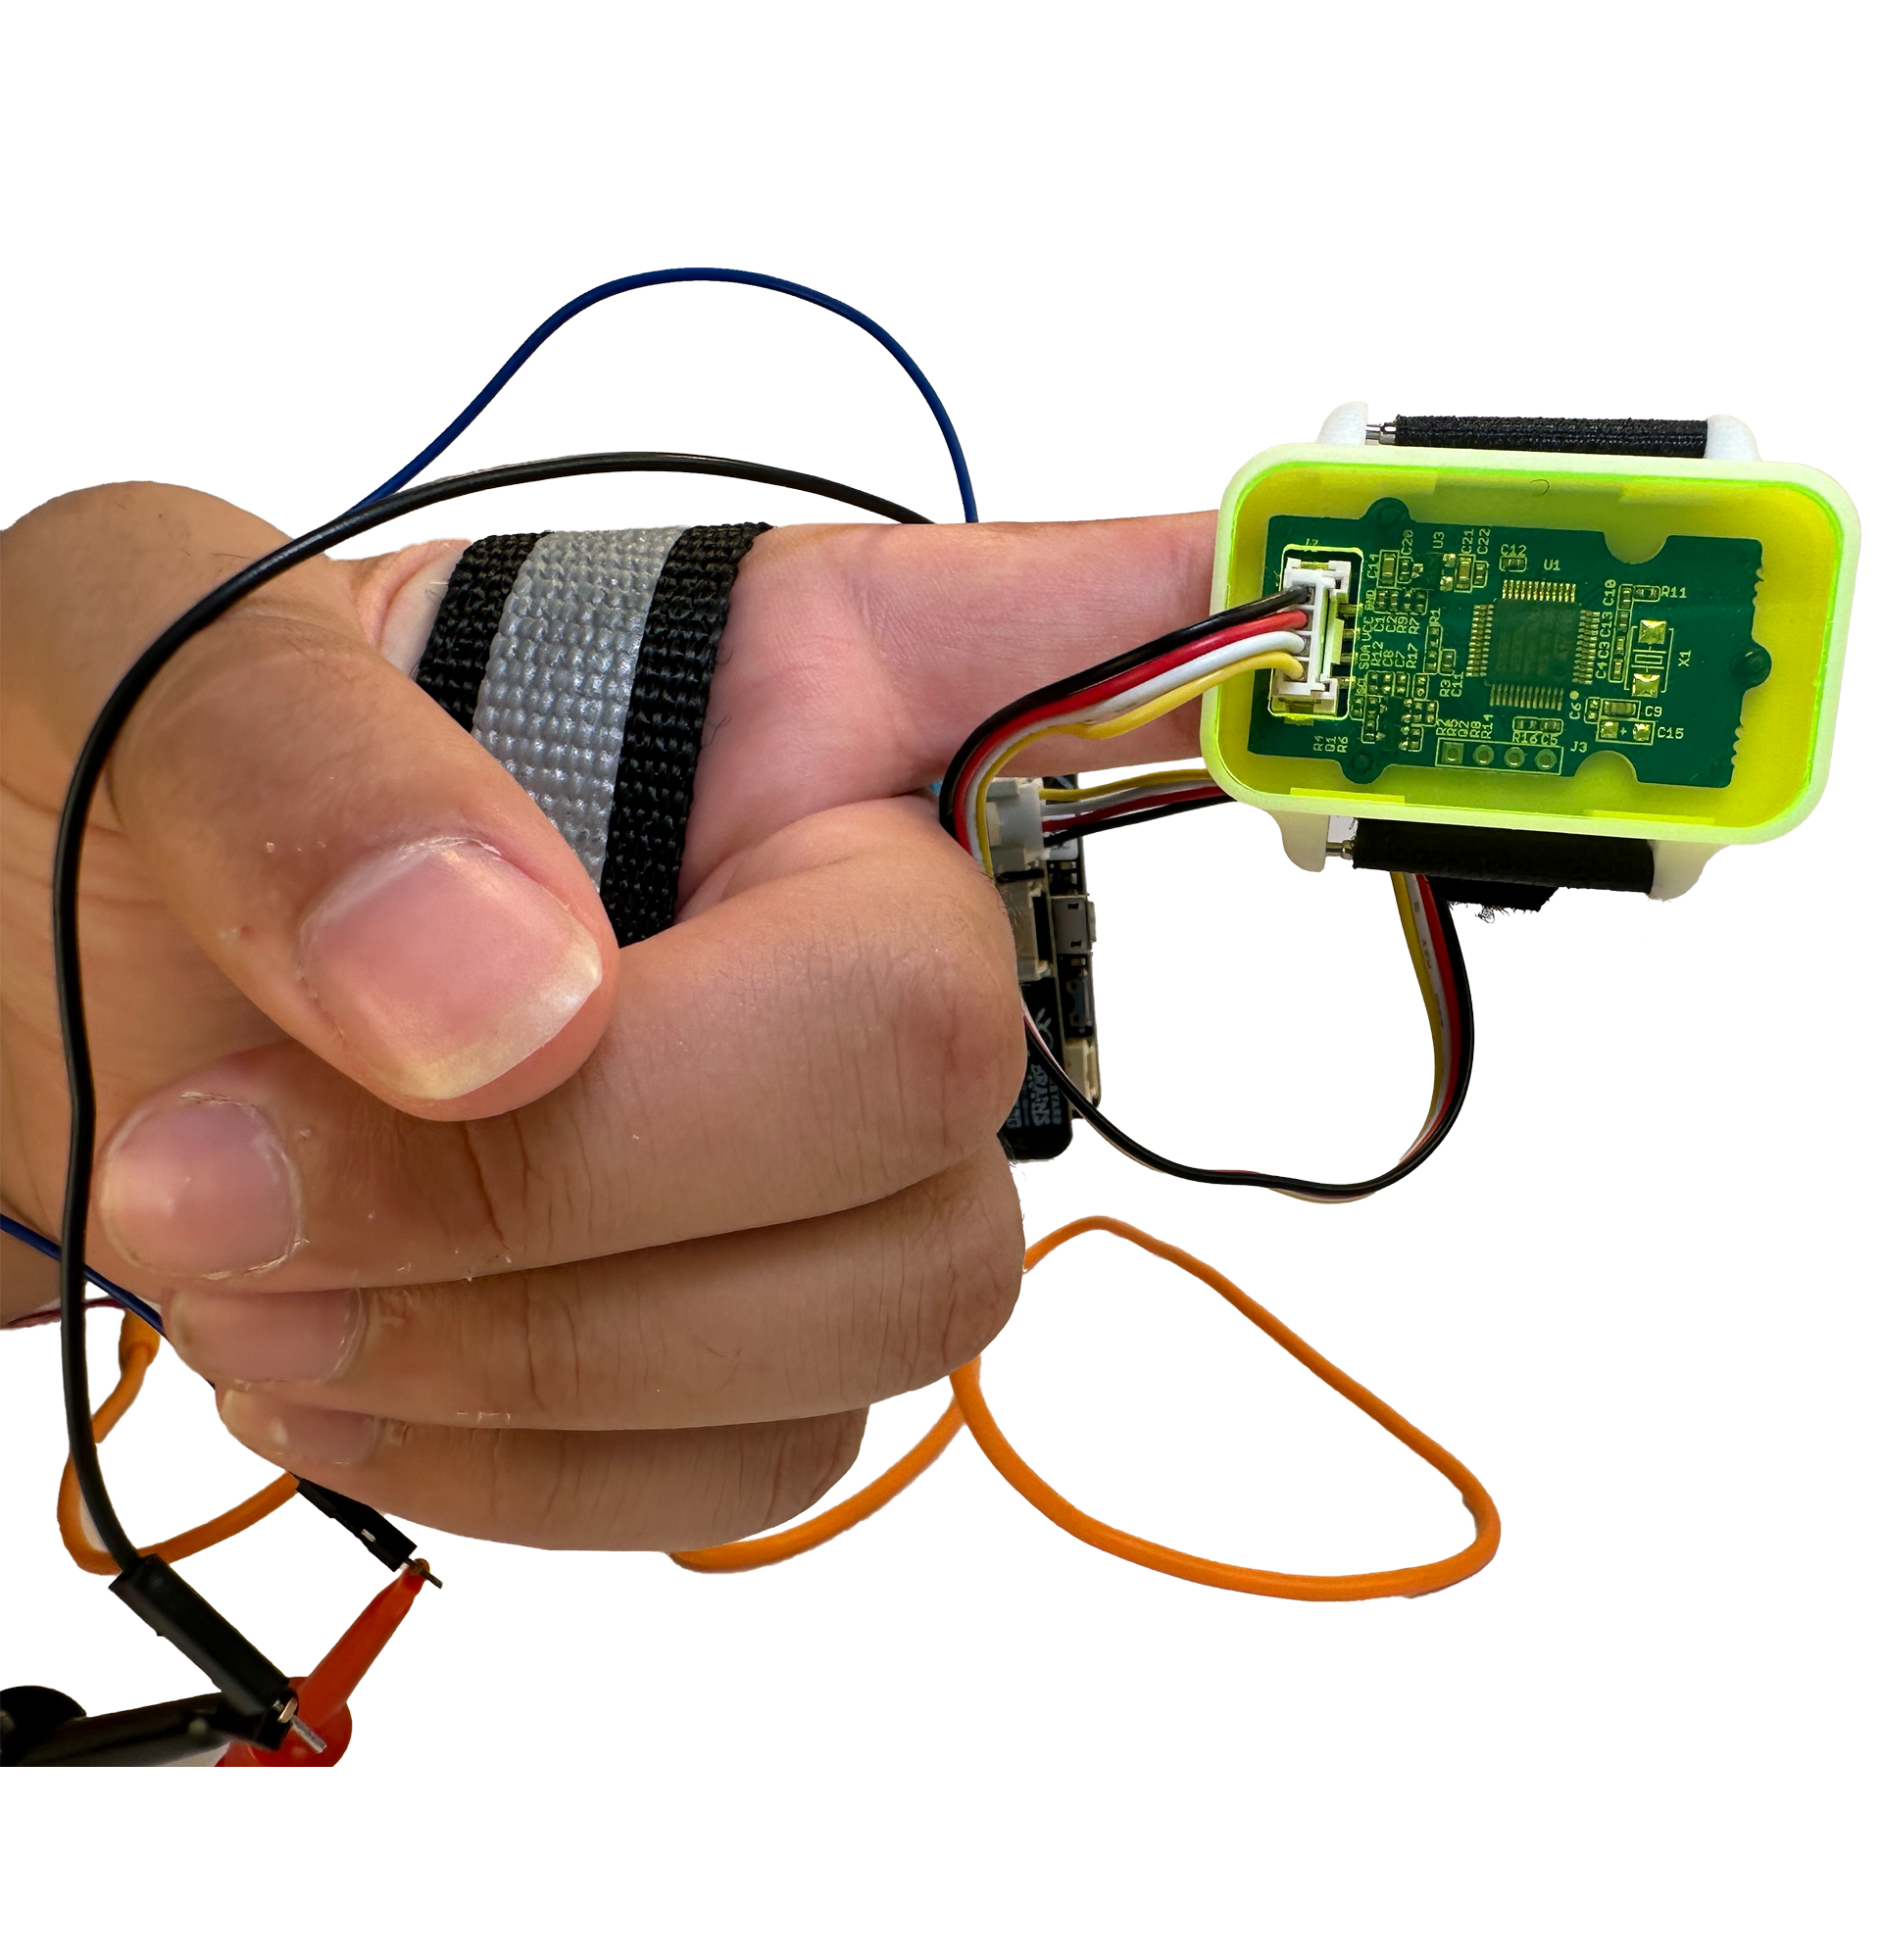
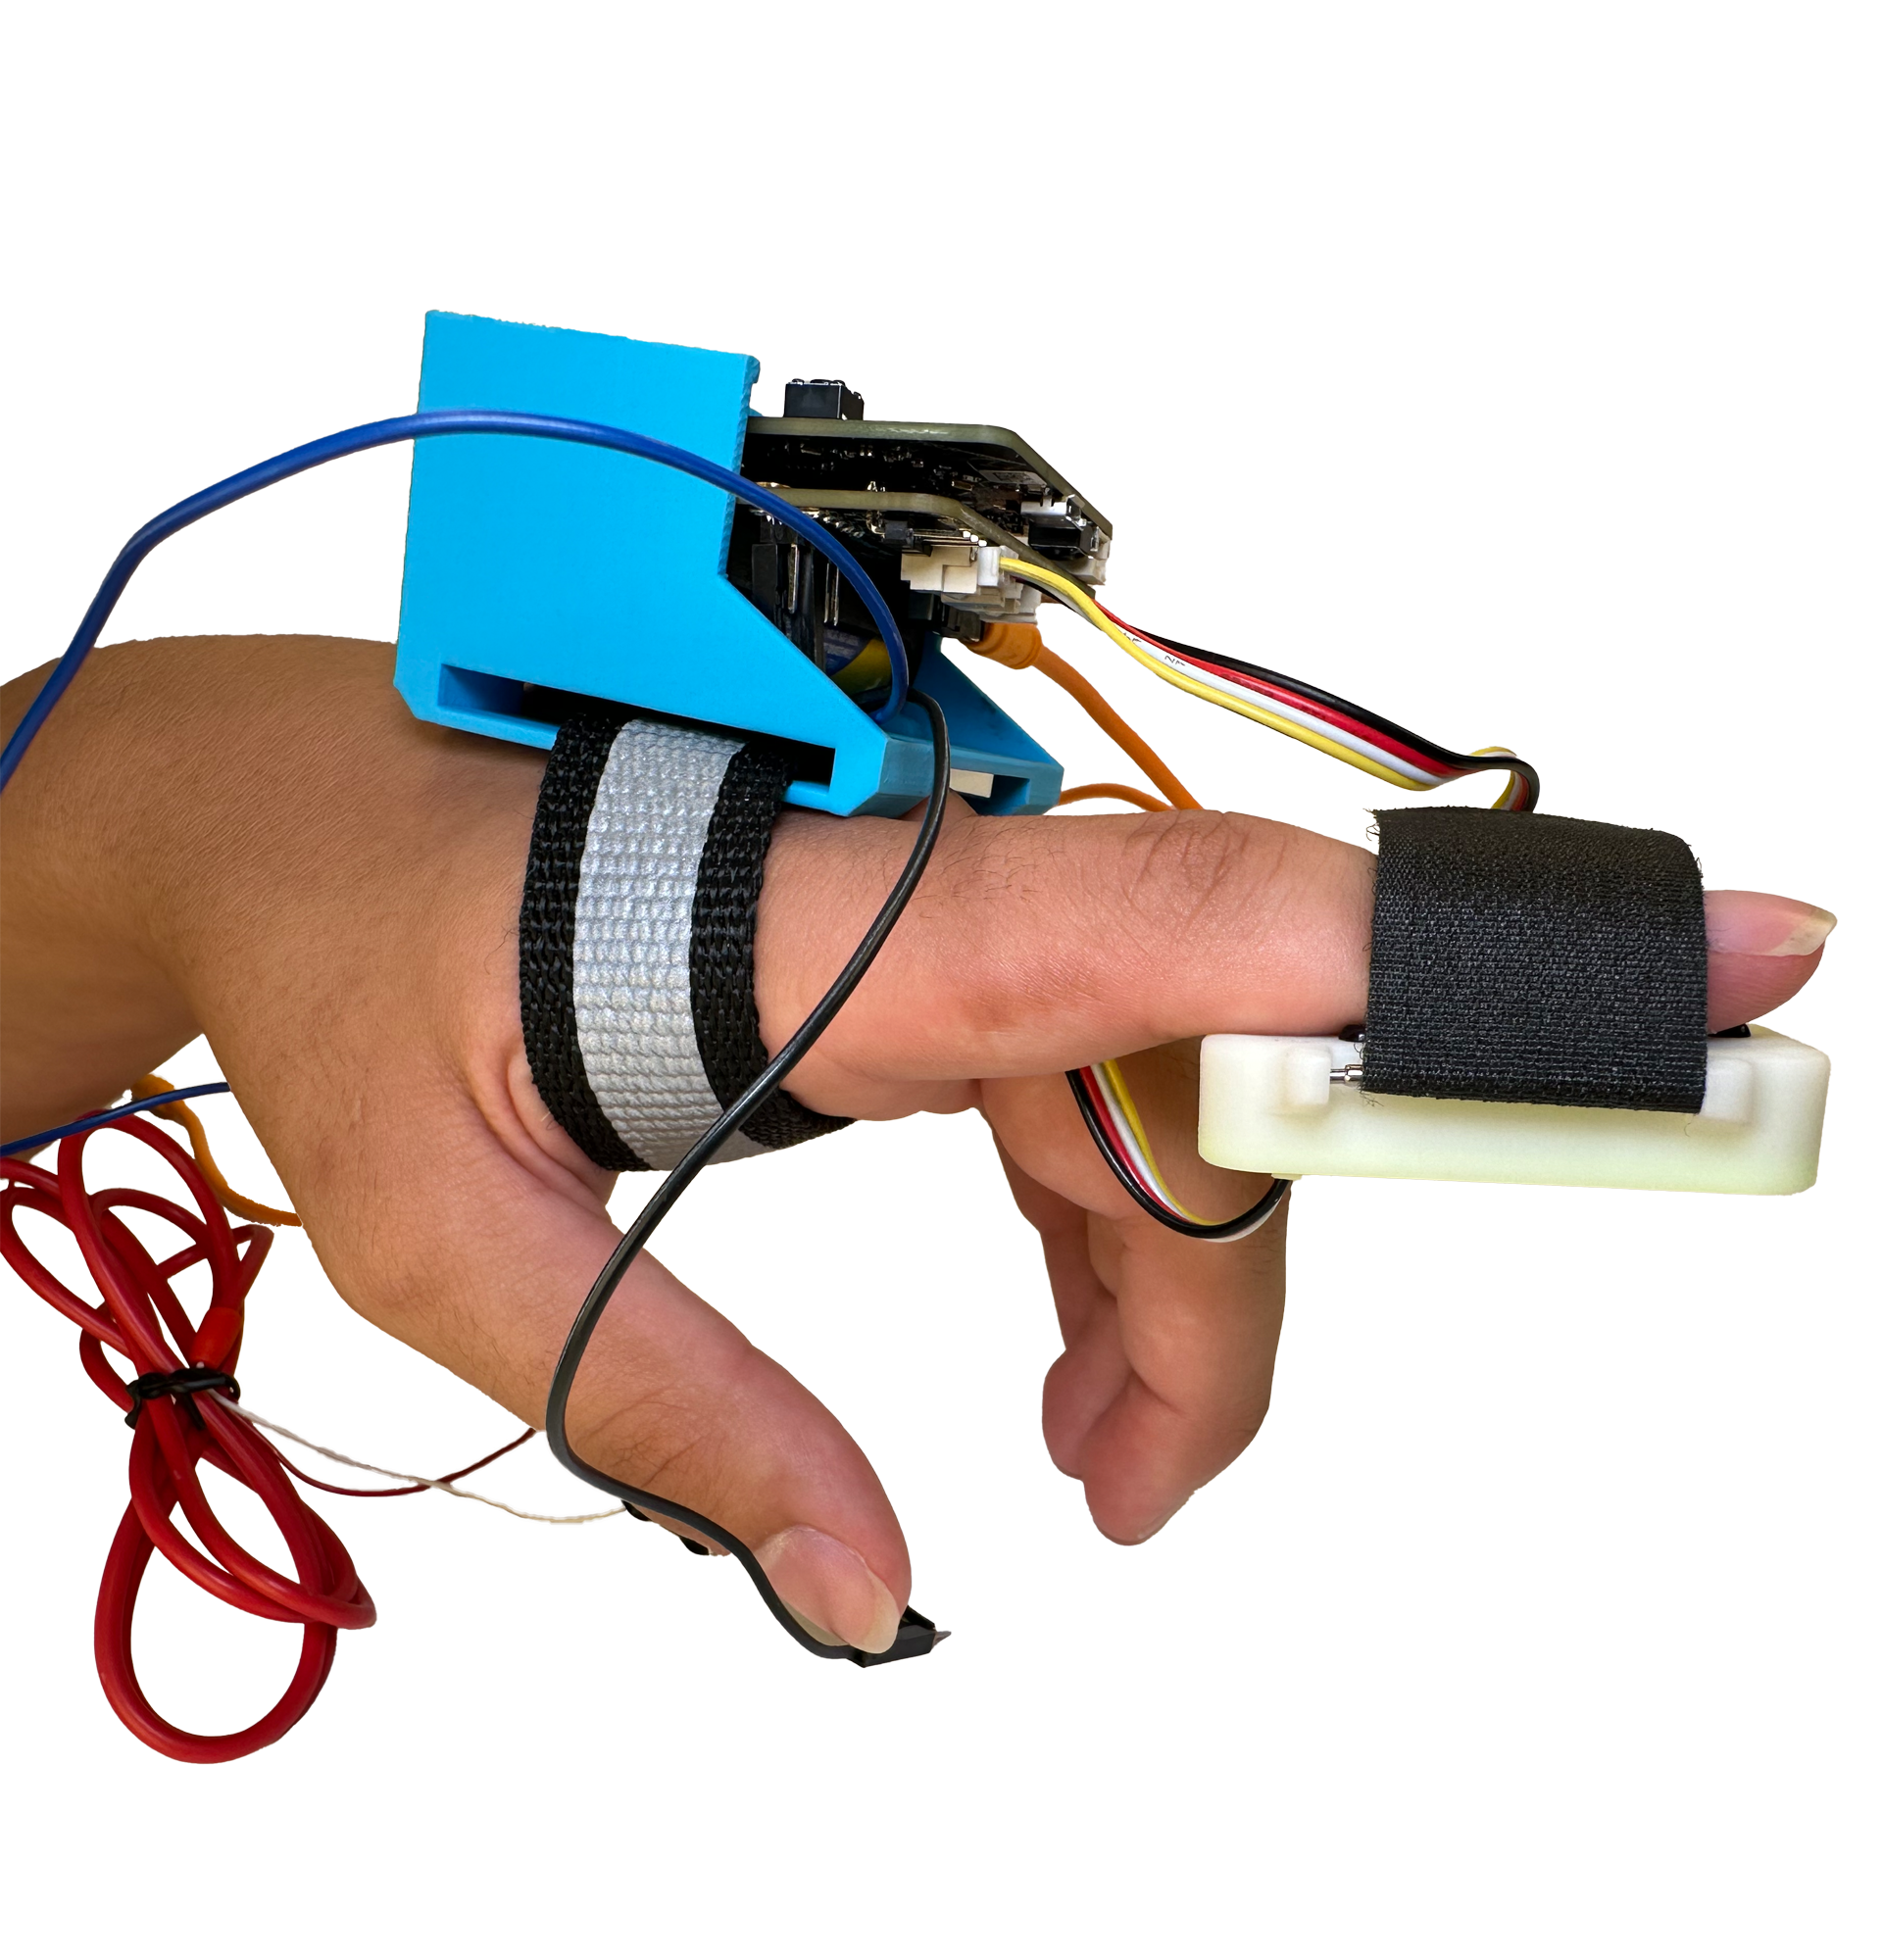
Voila! This is what the finished product should look like!
 We have the micro:bit and Spiker:bit devices connected and
inserted into their 3D printed casing. While external sensors like
the heart rate monitor and the EMG electrodes are connected to
their ports. With an additional external speaker so that everyone
can hear your physiological symphony! Now the only thing left is to
put in the code to make it all alive!
Coding it all together The project was coded in Python on the micro:bit web IDE. Here is the code:
from microbit import *
import music
import audio
import ustruct

# I2C address of the heart rate sensor
I2C_ADDR = 0xA0 >> 1

# Switch audio output to pin2
pin2.set_analog_period(20000)

octaves = [
[
'C0', # 16.35 Hz
'D0', # 18.35 Hz
'E0', # 20.60 Hz
'F0', # 21.83 Hz
'G0', # 24.50 Hz
'A0', # 27.50 Hz
'B0', # 30.87 Hz
'C1' # 32.70 Hz
],
[
'C1', # 32.70 Hz
'D1', # 36.71 Hz
'E1', # 41.20 Hz
'F1', # 43.65 Hz
'G1', # 49.00 Hz
'A1', # 55.00 Hz
'B1', # 61.74 Hz
'C2' # 65.41 Hz
],
[
'C2', # 65.41 Hz
'D2', # 73.42 Hz
'E2', # 82.41 Hz
'F2', # 87.31 Hz
'G2', # 98.00 Hz
'A2', # 110.00 Hz
'B2', # 123.47 Hz
'C3' # 130.81 Hz
],
[
'C3', # 130.81 Hz
'D3', # 146.83 Hz
'E3', # 164.81 Hz
'F3', # 174.61 Hz
'G3', # 196.00 Hz
'A3', # 220.00 Hz
'B3', # 246.94 Hz
'C4' # 261.63 Hz
],
[
'C4', # 261.63 Hz
'D4', # 293.66 Hz
'E4', # 329.63 Hz

'F4', # 349.23 Hz
'G4', # 392.00 Hz
'A4', # 440.00 Hz (standard tuning)
'B4', # 493.88 Hz
'C5' # 523.25 Hz
],
[
'C5', # 523.25 Hz
'D5', # 587.33 Hz
'E5', # 659.26 Hz
'F5', # 698.46 Hz
'G5', # 783.99 Hz
'A5', # 880.00 Hz
'B5', # 987.77 Hz
'C6' # 1046.50 Hz
],
[
'C6', # 1046.50 Hz
'D6', # 1174.66 Hz
'E6', # 1318.51 Hz
'F6', # 1396.91 Hz
'G6', # 1567.98 Hz
'A6', # 1760.00 Hz
'B6', # 1975.53 Hz
'C7' # 2093.00 Hz
],
[
'C7', # 2093.00 Hz
'D7', # 2349.32 Hz
'E7', # 2637.02 Hz
'F7', # 2793.83 Hz
'G7', # 3135.96 Hz
'A7', # 3520.00 Hz
'B7', # 3951.07 Hz
'C8' # 4186.01 Hz
]
]
current_octave_index = 4 # Start with octave 4 (index 3)
stopped = False

def read_heart_rate():
    try:
        # Request 1 byte of data from the sensor
        data = i2c.read(I2C_ADDR, 1)
        if data:
            # Unpack as unsinged char
            heart_rate = ustruct.unpack('B', data)[0]
            return heart_rate
        else:
            print("data is NONE")
        return None
    except OSError:
        return None

# Just printing Heart rate if it is not None, else print EMG
def printing(heart_rate, EMG):

    if heart_rate is not None:
        print("Heart Rate: {}".format(heart_rate))
    else:
        print("Failed to read heart rate")
        print("EMG Value: {}".format(EMG))
        print(" ")

# Main function
while True:
    # Get the EMG signal
    EMG = int(pin0.read_analog())
    # Get the heart rate
    heart_rate = read_heart_rate()
    # Using if/elif/else to change sound depending on accelerometer
    if accelerometer.is_gesture('shake'):
        music.play(octaves[current_octave_index][5], pin = pin2)
    elif pin_logo.is_touched():
        music.play(octaves[current_octave_index][6], pin = pin2)
    elif accelerometer.is_gesture('down'):
        music.play(octaves[current_octave_index][0], pin = pin2)
    elif accelerometer.is_gesture('up'):
        music.play(octaves[current_octave_index][2], pin = pin2)
    elif accelerometer.is_gesture('face up'):
        music.play(octaves[current_octave_index][1], pin = pin2)
    elif accelerometer.is_gesture('face down'):
        music.play(octaves[current_octave_index][7], pin = pin2)
    elif accelerometer.is_gesture('right'):
        music.play(octaves[current_octave_index][3], pin = pin2)
    elif accelerometer.is_gesture('left'):
        music.play(octaves[current_octave_index][4], pin = pin2)

    # Button A for shifting octave higher
    if button_a.was_pressed():
        current_octave_index += 1
    if current_octave_index > 7:
        current_octave_index = 7
        print("Octave shifted higher")
        sleep(250) # Debounce

    # Button B for shifting octave lower
    if button_b.was_pressed():
        current_octave_index -= 1
    if current_octave_index < 0:
        current_octave_index = 0
        print("Octave shifted lower")
        sleep(250) # Debounce

    # If accelerometer detect 3g worth of movenment, then turn on/off the speaker
    if accelerometer.was_gesture('3g'):
        if stopped:
            speaker.on()
            stopped = False
        else:
            speaker.off()
            stopped = True

    printing(heart_rate, EMG)

    # Loudness control using EMG
    if EMG < 200:
        set_volume(128)
    else:
        set_volume(EMG)

    # Fix: Change to this
    # if heart_rate is not None:
    #     music.set_tempo(bpm=heart_rate)
    music.set_tempo(bpm=heart_rate)

    # Fix: This is probably unnecessary
    EMG = int(pin0.read_analog())
    sleep(250)
Conclusion
And with that you got everything you need to jump into a rave and be the star of the night! That’s everything needed for this project. With the final touch of the Python code, everything should be ready to go! You are now free to experiment and make your music, try playing Beethoven’s Ode to Joy!